Intro
In this post we are going to look at creating a Project Tracker application in Power Apps using Dataverse and Model-Driven apps. I’ve previously built a project tracker using a SharePoint Lists which is a good tool for this, click here to see that post. It’s even possible to use SharePoint Lists as a data source for both Canvas and Model-Driven apps. But today we are going to use Dataverse, and I’ll go into the reasons why and provide step by step guidance on setting it up.
Why Use Dataverse Over SharePoint Lists?
This is a great question, and there is really no right or wrong answer, it solely depends on the use case. Both are very different in their purpose and administration. Dataverse is a much more robust database solution, there are no limits on storage capacity, and it has very strict data governance. Security is less secure in a SharePoint List and there is a 30 million record limit. For this example, I want to build the app as a Model-Driven app and Dataverse is its main data source. You will see how intertwined they are and how easy it is to get started and up and running.
Create a Solution
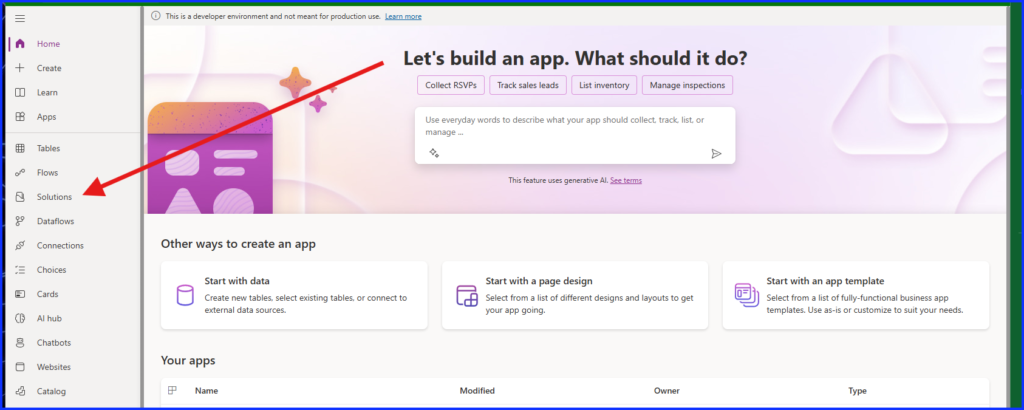
Go to Power Apps and then “Solutions”.
Check out my YouTube video based on this post.
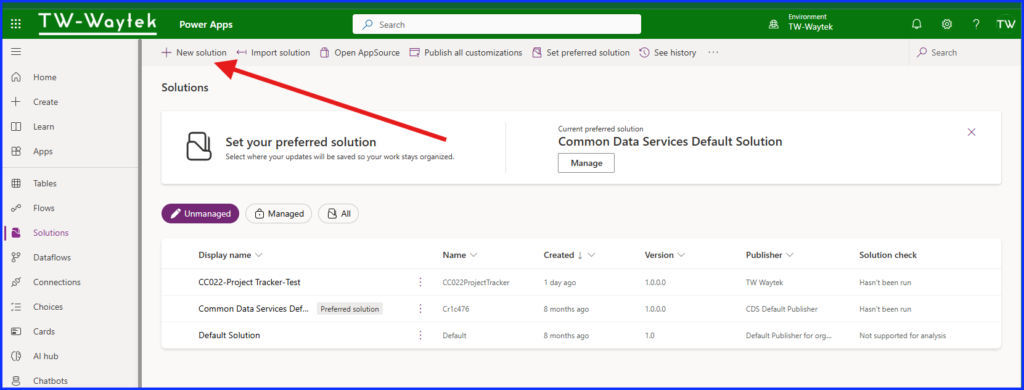
Then select “New Solution”.
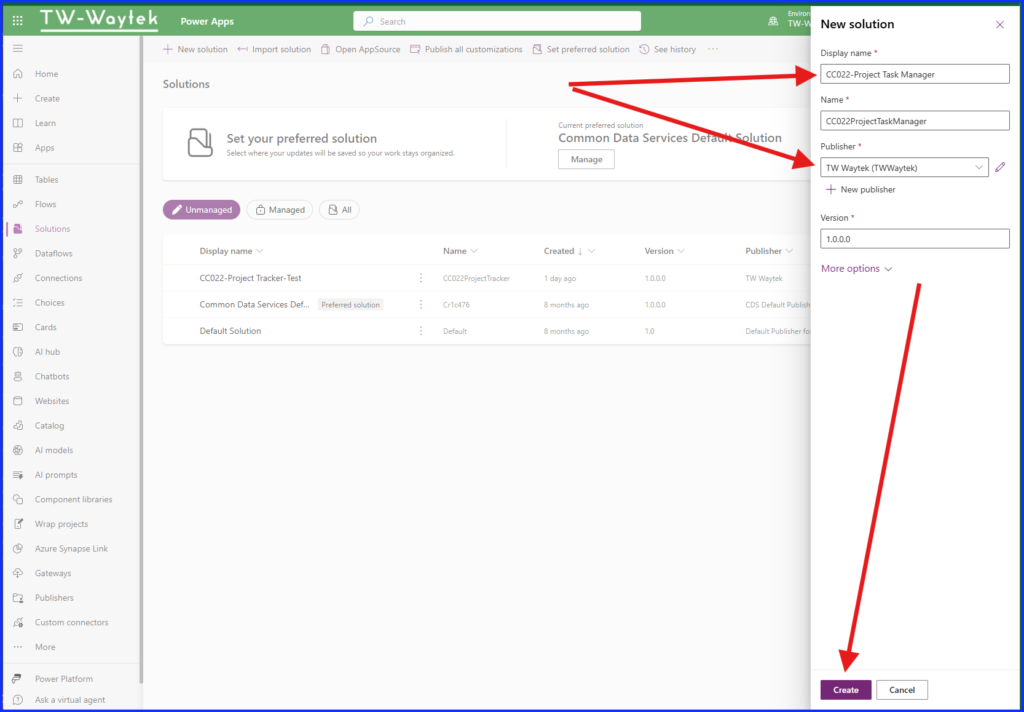
Provide a “Display Name” for your solution, the “Name” field will automatically populate. Select a “Publisher”, you can create a new publisher or select the default. Click on “Create”.
The next step is to create a table, you will be taken to a screen with several options, pick the “Start from Blank” option.
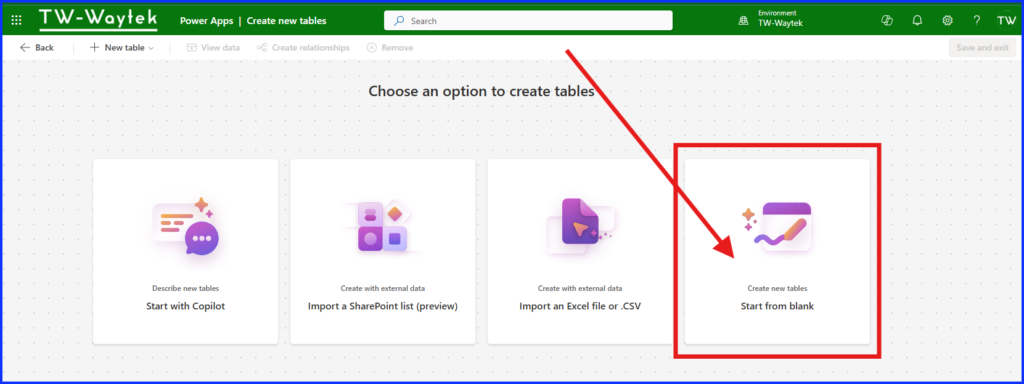
You are taken to the Solution’s page where you will select “New”, then “Table”, then “Tables”

This takes you to the new page to create a table from blank. Provide a name for your table.
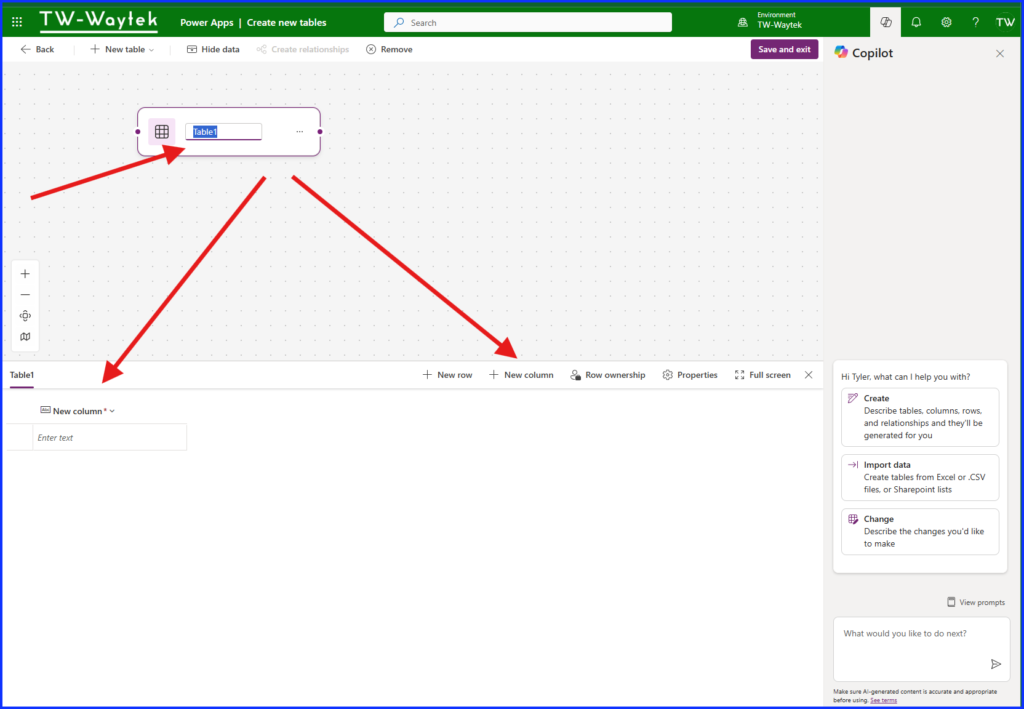
Next, provide a name for the first column. This column will be your ID field so make sure to name it accordingly.
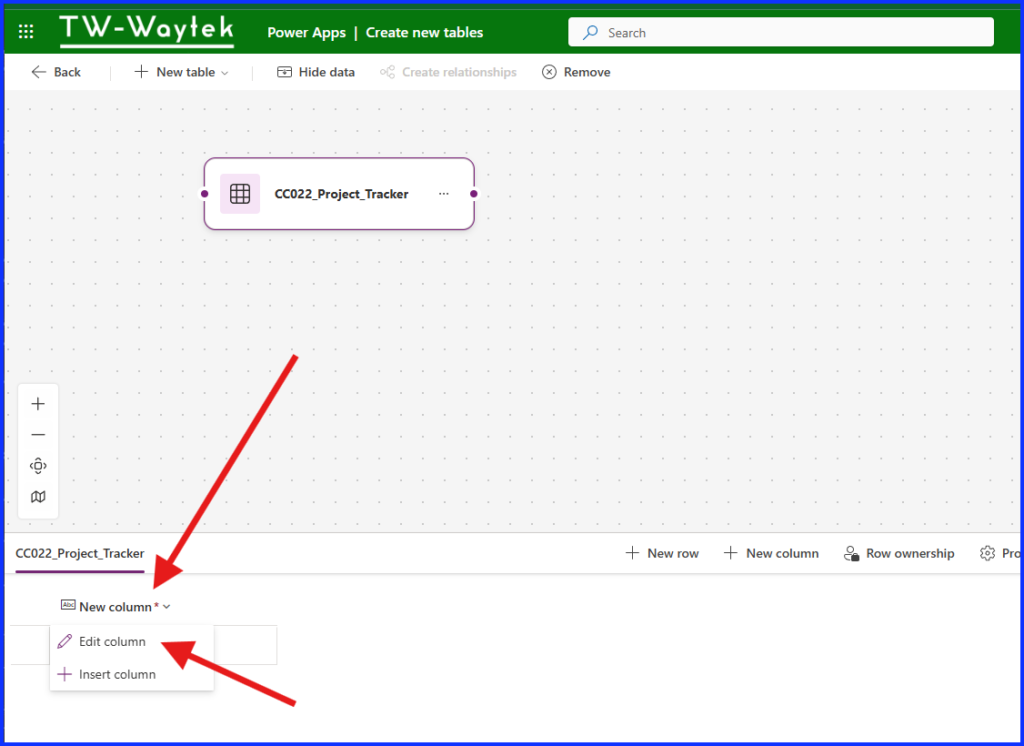
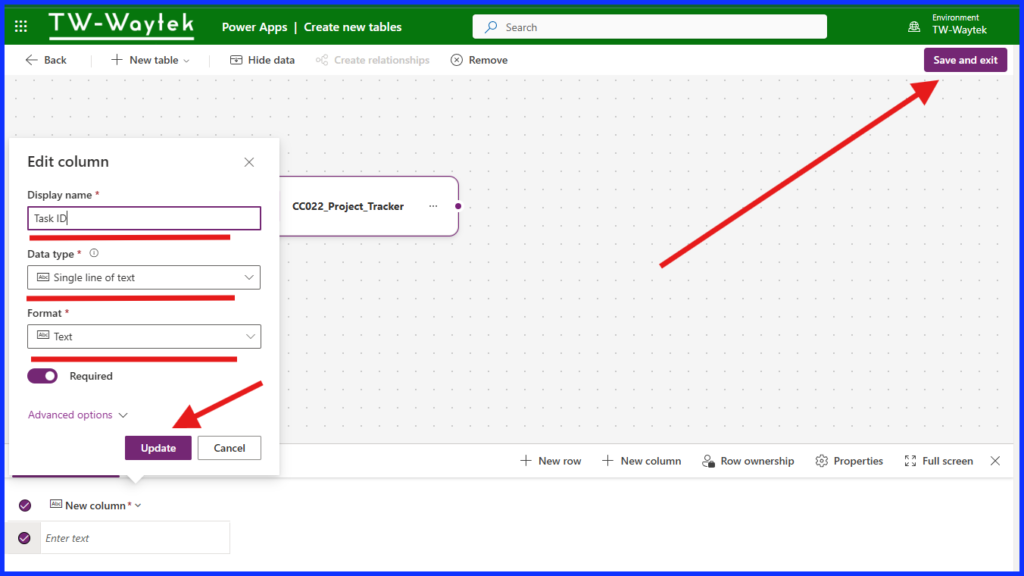
Provide a “Display Name”, select “Single Line of Text” as the data type, and “Text” as the format. I’m going to change these settings in the next step so no need to spend too much time on it. This is due to not having all the all the data type options in this new view. This probably will change over time. Select “Update” and then “Save and Exit”.
Select your table and then “Columns” and find the name of your column, mine is “Task ID”. Select it and then “Edit”.
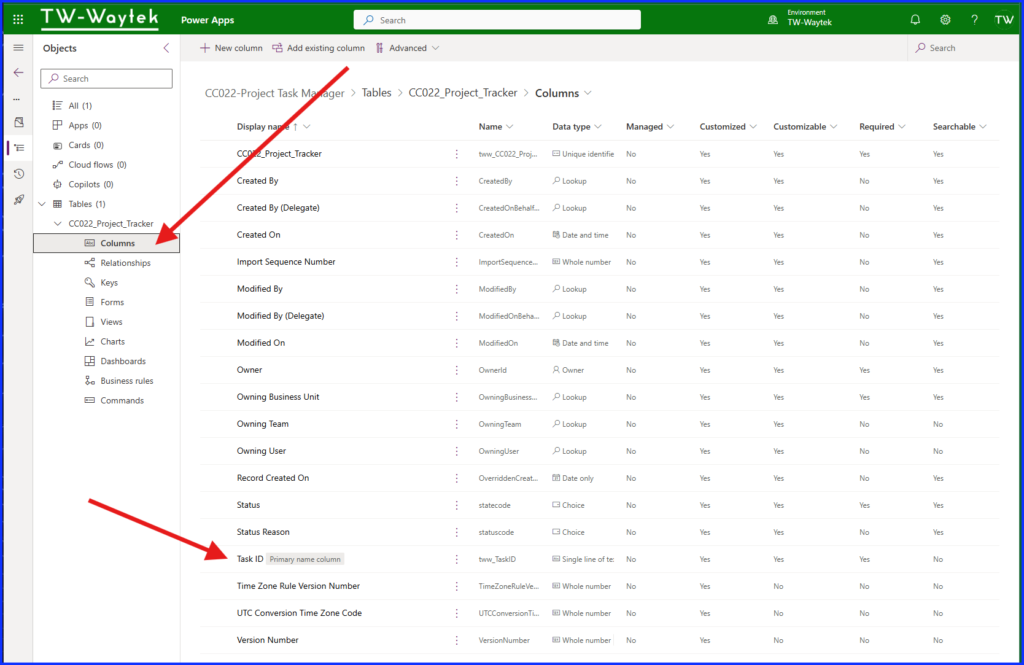
Change the “Data Type” to “Autonumber”, it should already be “Business Required”, change “Autonumber Type” to be “String Prefixed Number”. My Prefix is “Task” and starting at a “Minimum Number of Digits” of 4.

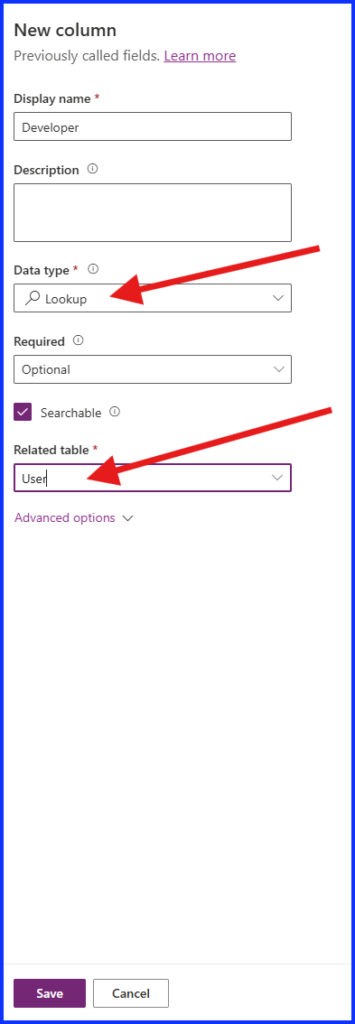
Next, we are going create two fields that are lookups fields called “Developer” and “End User”. They will reference data from the “User” table which includes org tenant users within the environment you are housing your solution. When adding Dataverse to an environment, there are many system tables that are automatically added. There is also the option to add tables from Microsoft’s ERP platform Dynamics 365 which runs on Dataverse.
To create these two fields, select “New Column”, add the “Display Name”, for “Data Type” select “Lookup” and under “Related Table” select “User”.
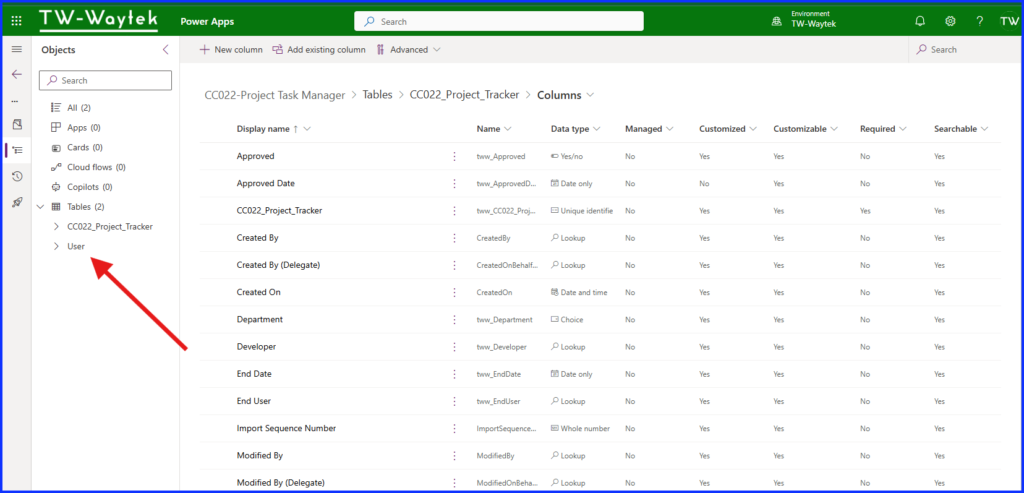
When adding a lookup table, it is automatically added to your solution.
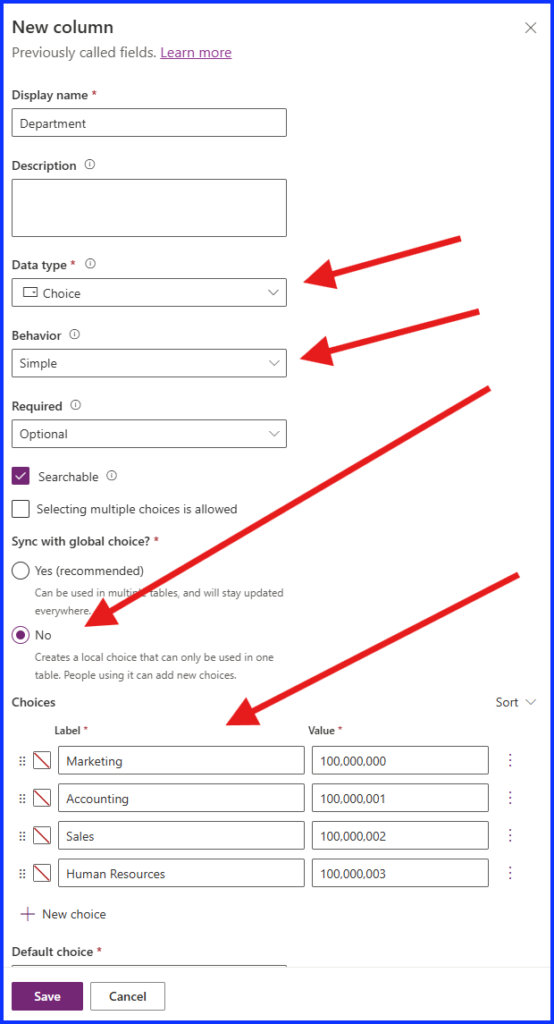
The next field is called “Department” and is a drop-down column called a “Choice” column data type. There are two options when creating a Choice column under the “Sync with Global Choice” selection. If you select “Yes” it will add your choices as its own table for reference to be accessed in other apps or solutions. You can see all the available Choices by going to the Power Apps home page and looking for it under the left-hand navigation side bar.
For this example, I’m not adding my choices as a global choice which means they are only available in this table. Add a label for each choice, do not worry about specifying a value for each. I’m adding 4 choices to my drop down: Marketing, Accounting, Sales, and Human Resources. I do not provide a default choice. Lastly, click “Save”.
Create another Choice column called “Project Status”, I selected No for syncing as a global choice but it’s up to you to choose your preference. My choices include Not Started, In-Progress, and Completed. I also select the option “Not Started” as the default choice.
Next, we are going to create three date fields, Start Date, End Date and Approval Date using the Date Type “Date and Time” with the “Date Only” format.

Next is a Yes/No data type column called “Approved”. No other changes needed.
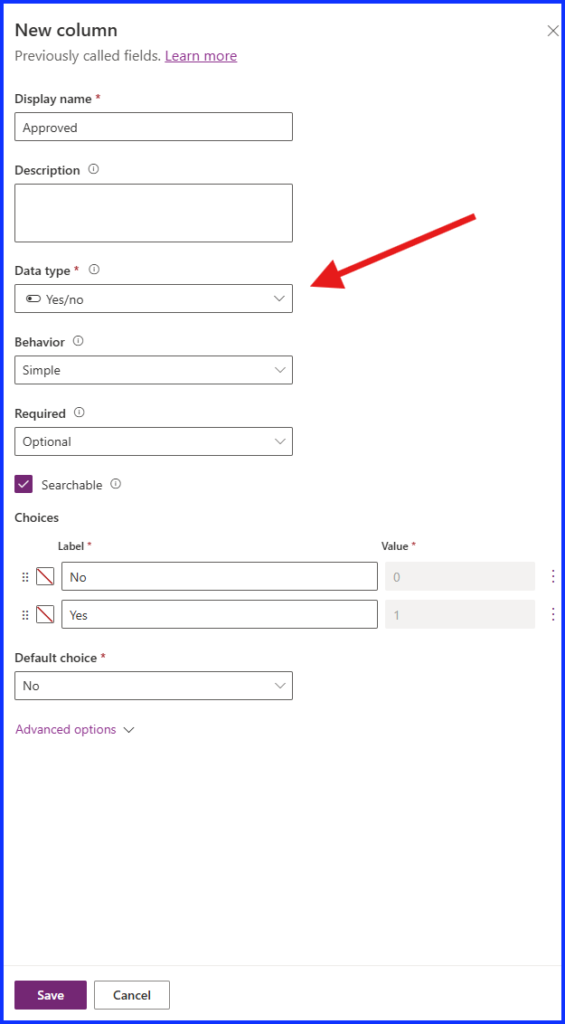
The last two columns are text columns, the first is a “Single Line” text column named “Task Name” and the other is “Multiple Lines of Text” with a “Rich Text” format called “Task Details”. I only show the latter below.
This finalizes the initial setup of the Project Tracker table.

How Dataverse is Different
If you’ve ever worked with databases like SQL Server or Microsoft Access, you know you need to create forms, views, reports, dashboards separately from tables and even in separate applications for SQL Server, but with Dataverse these items are integrated with their tables for use with Model-Driven apps.
Dataverse Forms
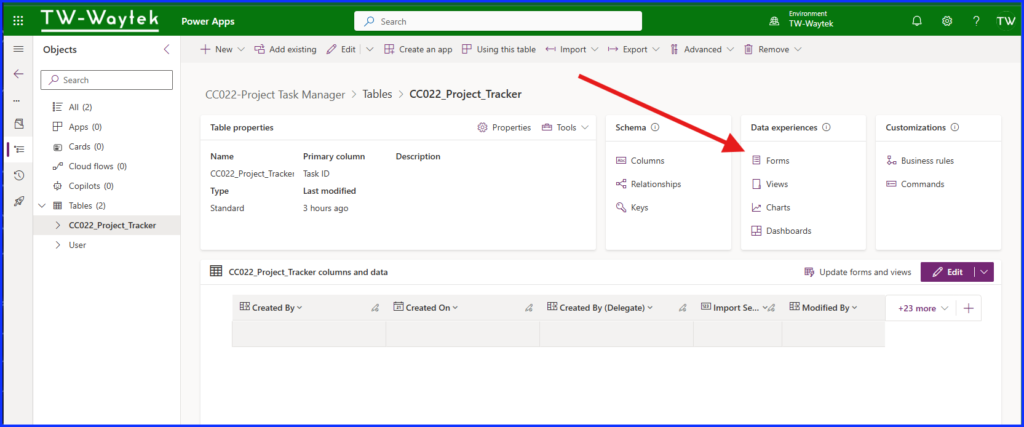
From within the solution select the Project Tracker table and either select “Forms” under “Data Experiences” or click on the table on the left navigation and select “Forms”.
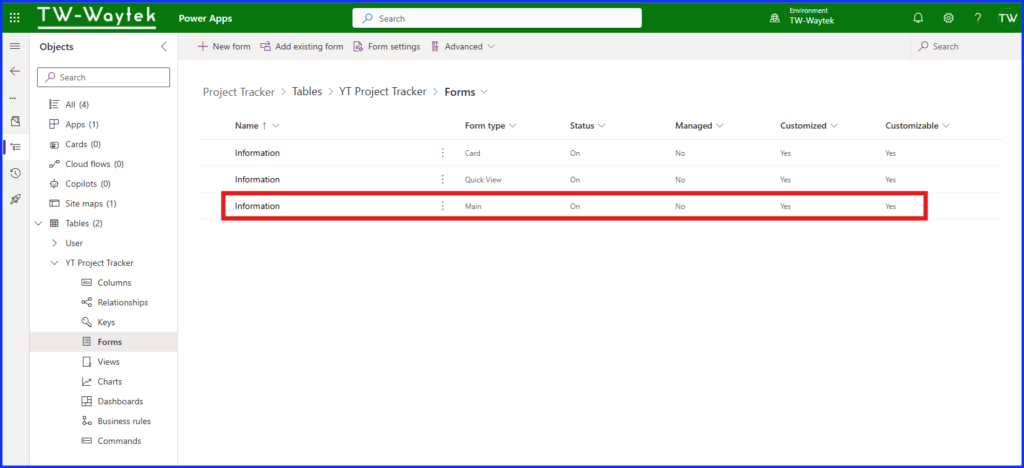
We are only going to update one of the default forms called “Information” and under the Form Type “Main”.
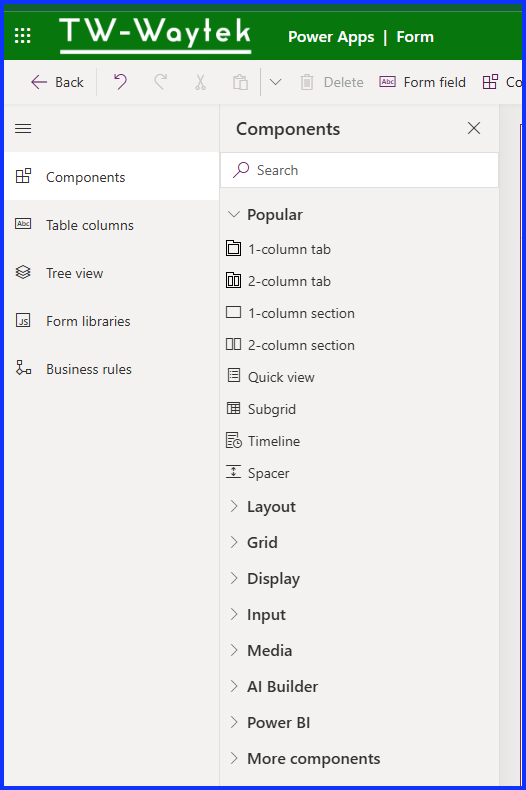
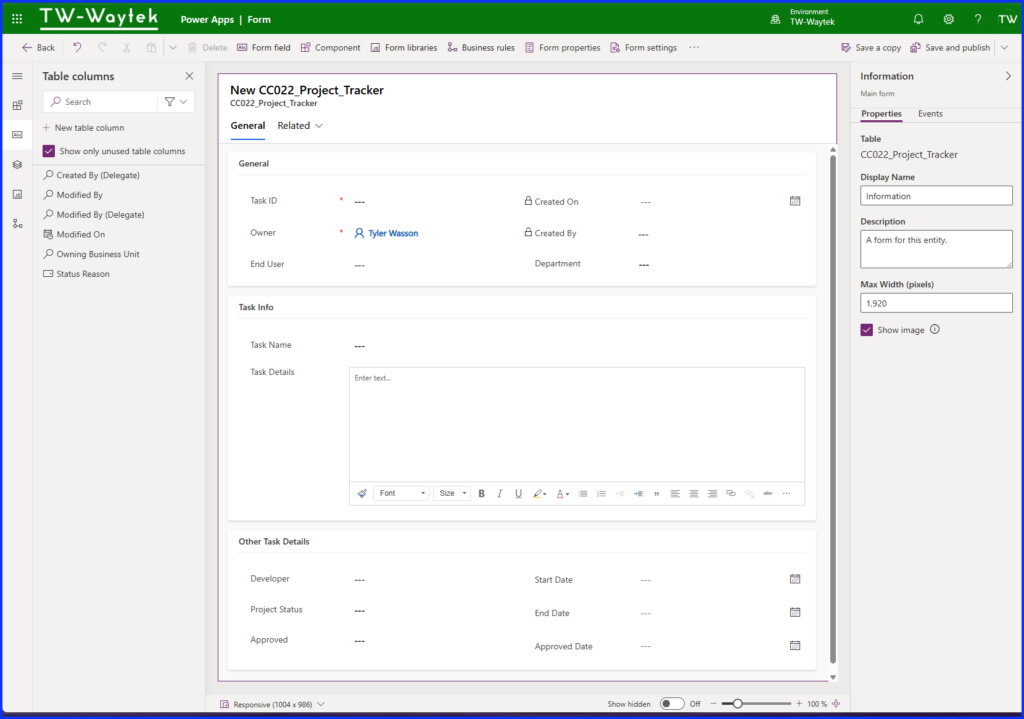
My form has one 2-Column Section at the top, one 1-Columnb Section in the middle, and one 2-Column section at the bottom that you will find under components.
Select the Table Columns link in the left navigation and drag the fields into to each of the sections based on the setup below. For more intricate details on how to update the form I recommend going to my YouTube video embedded in this blog post. It is broken down by chapters so you can go directly to the forms part.
Dataverse Views
Now that our form is the way we want, the next step is to update our Views. We are going to change two of the default views, the active records and inactive records.
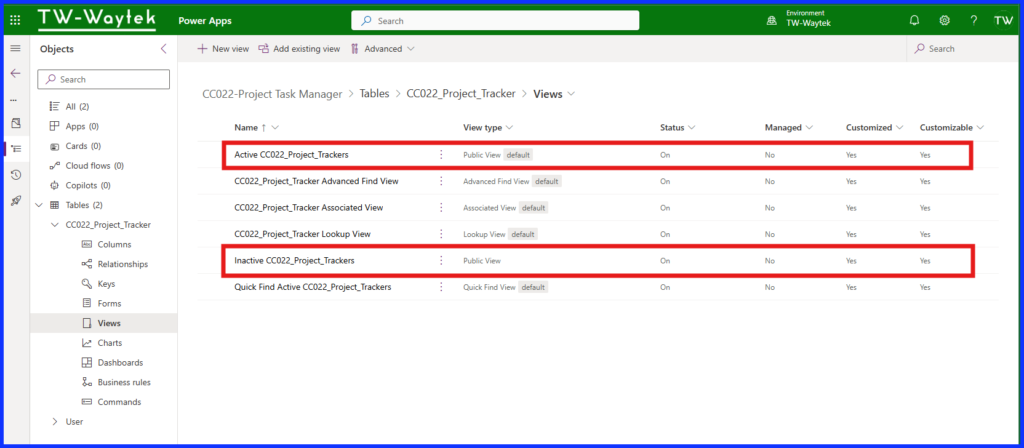
Select Active Project Trackers to edit the view. There are two default columns in the view: Task ID and Created On. To the right of the columns is + View Column button, select it to add additional columns. I’ve added Task Name, Developer, Project Status, Start Date, End Date, Department, and End User. No other changes were made.
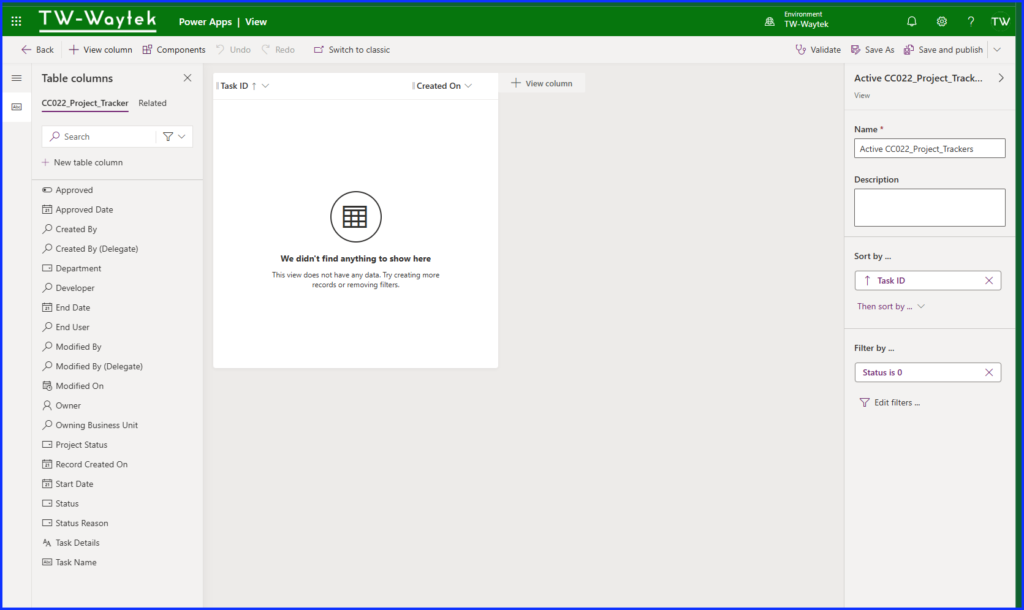
You can see the final setup below. Do the exact same thing for the inactive Project Tracker view.

Create a Model-Driven App
Next, we are going to add a Model-Driven app to our solution. From the solution home page, select All or Apps and then the “New” drop down, select apps, then Model-Driven apps.

Next, we want to add a new page from the top menu and add a Dataverse table. Select your project tracker table.
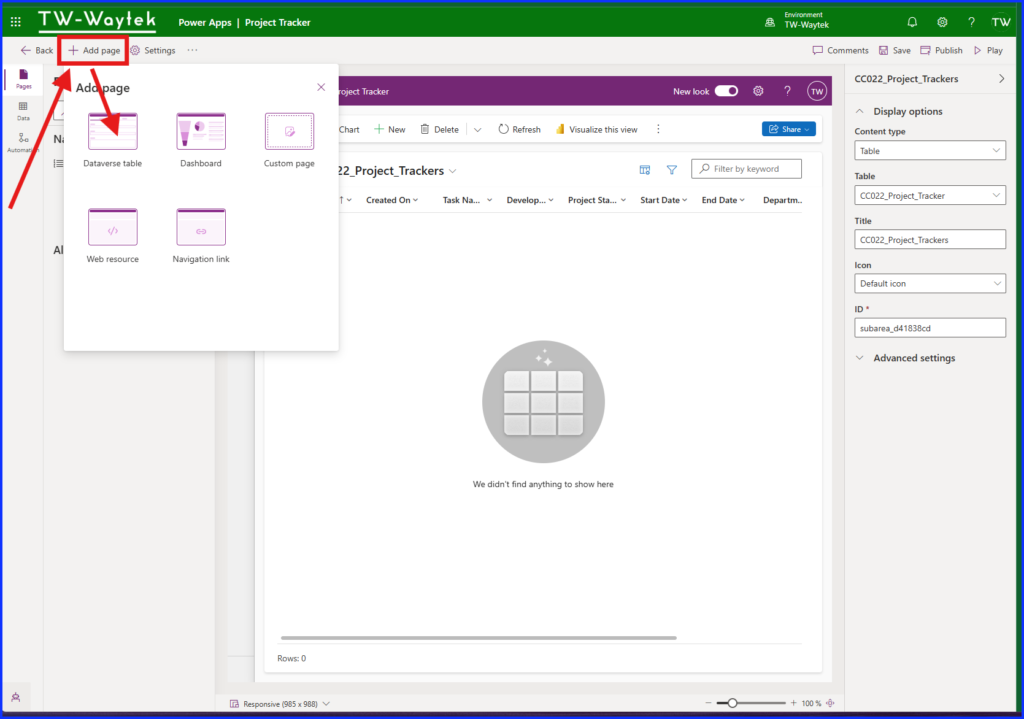
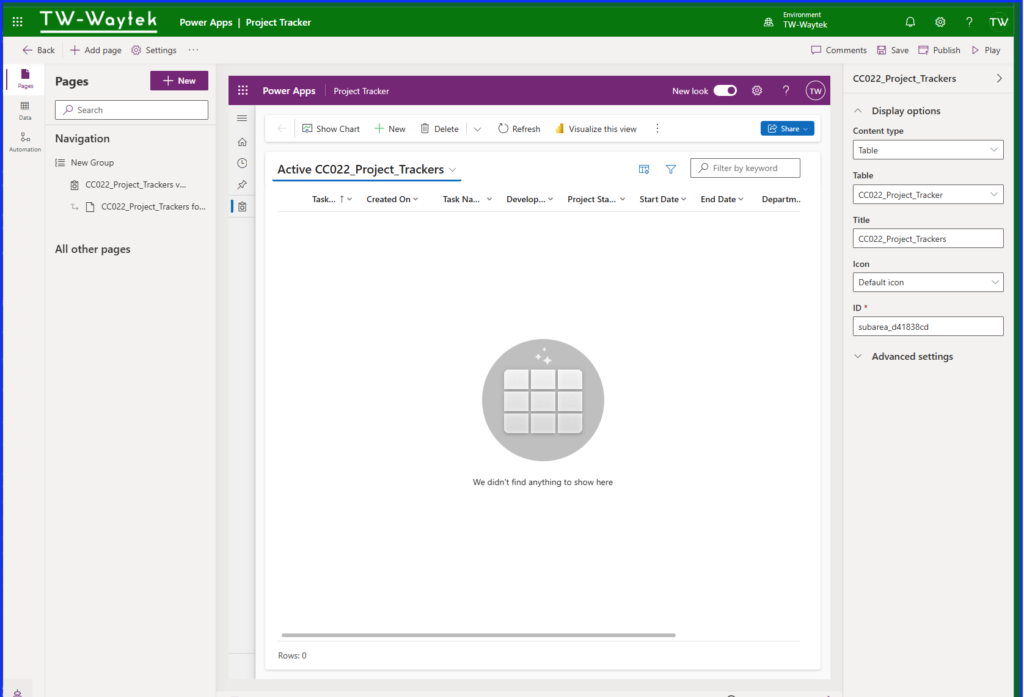
The forms and views we updated within Dataverse will automatically be utilized in the app. Below is our active records view.
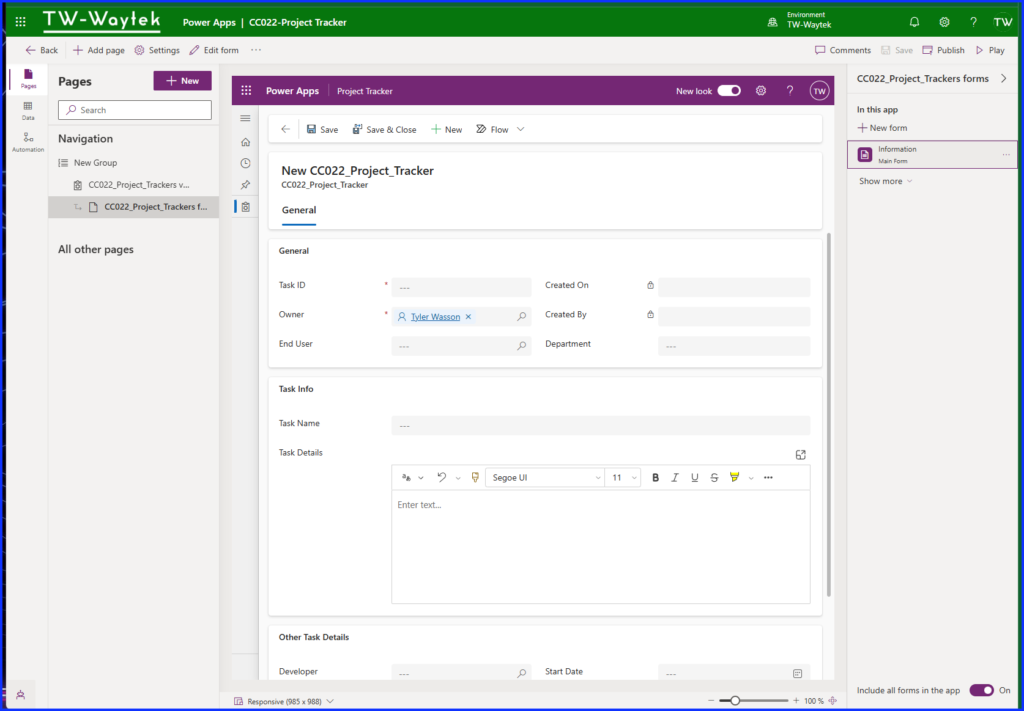
Below is our new forms record view.
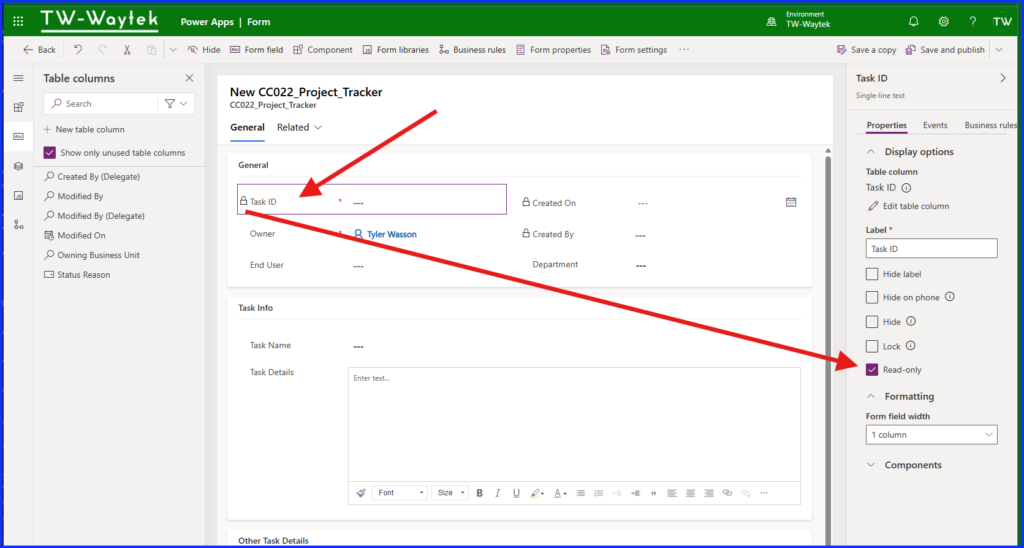
There is one small change to the form, change the Task ID field to Read-Only as shown below.
Deploy Solution
The model driven app is now ready to deploy. From the Solutions home page select “Publish All Customizations”. This will publish all previous changes and updates in the solution.

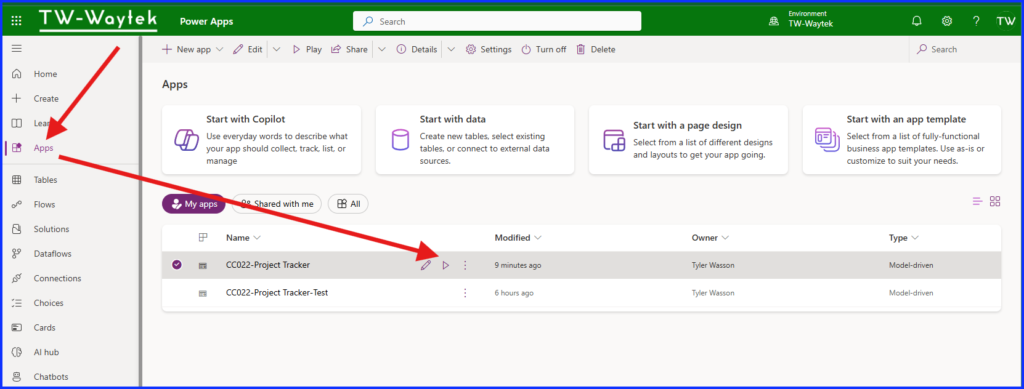
To access the app, go the Apps link on the left-hand navigation and select the filter either “My Apps” or “All” to find it. Select the triangle button (Play Button) to run the app.
Your Project Tracker app is now ready for use.
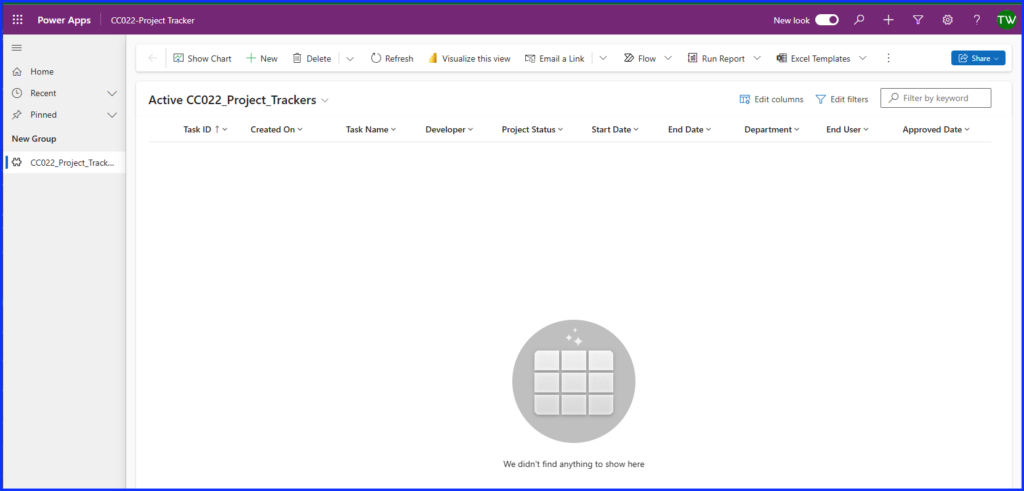
Select the + New button to add a new record.
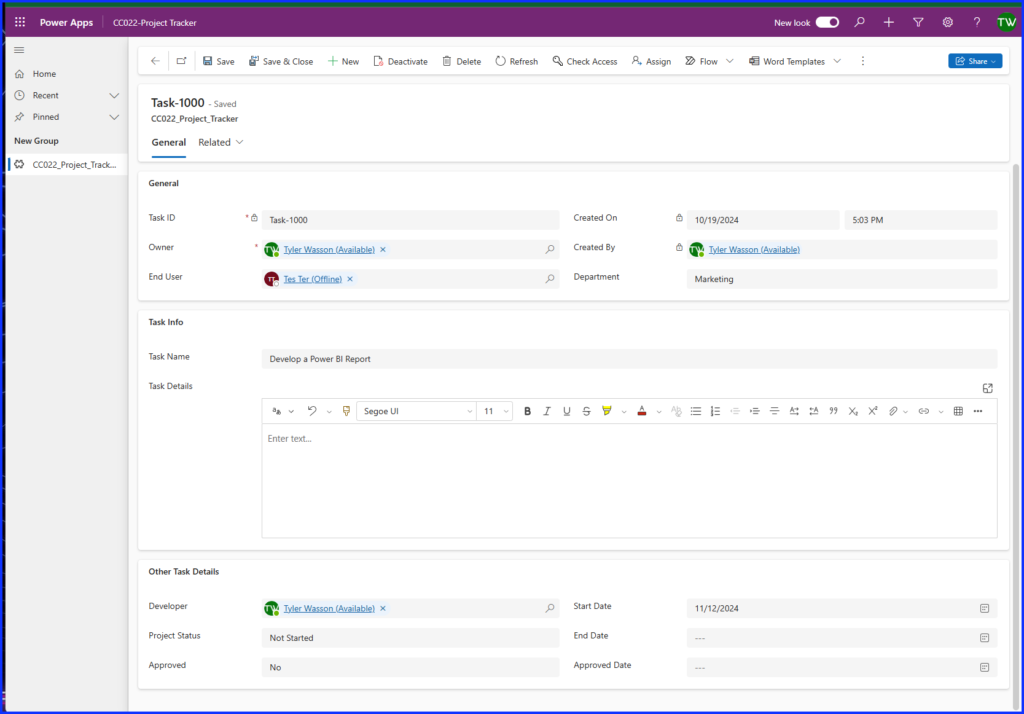
You should now see your first record in the Active records view.

Share The App
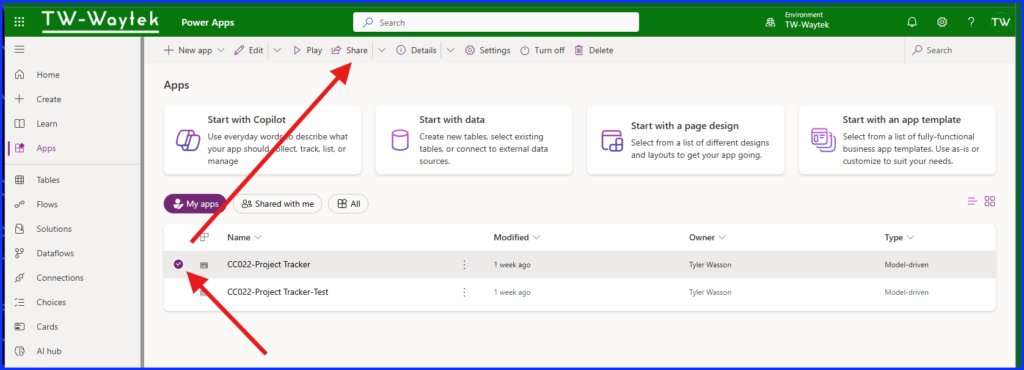
At the moment your app is only available to you. You need to share it with individuals or groups for others to access it. To do this go to the main app screen and select the app and then the share button in the top menu.
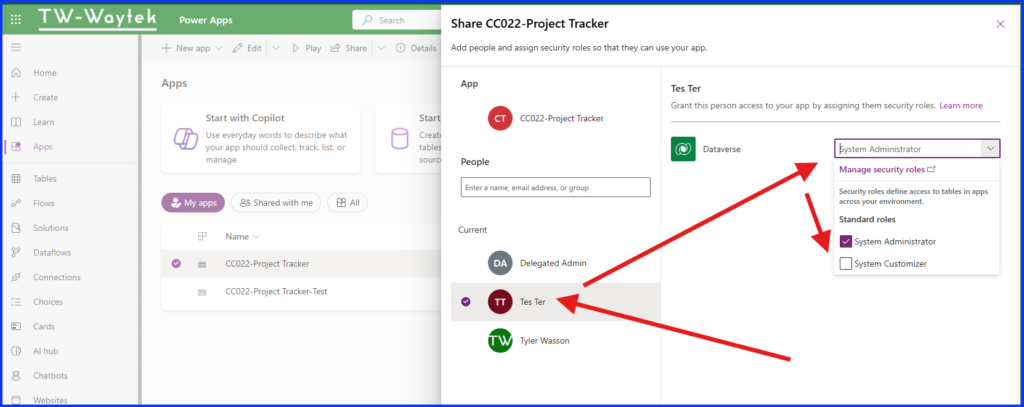
Select the individual users or groups and then assign them a Dataverse security role. These should be setup by your Power Platform administrator. They will need to be configured before you can share your app. For more information on assigning security roles for Model-Driven apps click visit this link: Sharing a model-driven app – assigning security roles and privileges – Power Apps | Microsoft Learn.
Conclusion
Your Model-Driven app is now ready for use by your team. We’ve discussed the basics of getting a project/task tracker up and running quickly but there is so much more that can be done with this app. You can expect to see more on this topic in future posts, so stay tuned. I’d love to hear your feedback, do not hesitate to leave a comment or reach out to me via my social media links.


