In today’s fast-paced business environment, managing financial transactions with precision and efficiency is crucial. One of the most challenging tasks in financial management is reconciling invoices with their corresponding purchase orders. This process, often tedious and time-consuming, is prone to human error, leading to discrepancies and delays.
Enter the innovative solution of leveraging Copilot Studio and Power Automate to create an intelligent Copilot Agent. This advanced agent is designed to seamlessly reconcile invoices with their corresponding purchase orders by utilizing a third-party AI service called Nordoon AI. By automating this critical task, businesses can ensure accuracy and efficiency in their financial and supply-chain operations.
The integration of Copilot Studio, Power Automate, and Nordoon AI not only streamlines the reconciliation process but also enhances the overall financial management system. This intelligent Copilot Agent reduces the manual workload, minimizes errors, and accelerates transaction processing times. As a result, businesses can focus more on strategic decision-making and less on administrative tasks.
Requirements to Complete this Post
- You will need a Microsoft 365 Copilot license or free trial version to use Copilot Studio.
- You will need a paid version of Nordoon.AI to complete this entire post. The free version will allow you to test the Invoice Reconciliation template but not utilize the lookup table needed to complete the entire process.
Catch the YouTube video of the live webinar with me and my friends at Nordoon AI.
Overview
- Create a Copilot agent
- Pass along the invoice attachment to Power Automate
- Receive the parsed reconciled result from Power Automate
- Configure Power Automate Integration (click here to navigate there)
- Receive the invoice to reconcile
- Send the invoice content to Nordoon AI for reconciliation processing, send the details back to Power Automate
- Receive the invoice reconciliation details from Nordoon AI
- Parse the results of the reconciliation
- Send parsed reconciliation results to Copilot agent
- Setup Nordoon AI Service (click here to navigate there)
- Create a template to process the invoice and reconcile it against its purchase order.
1) Create Copilot Agent
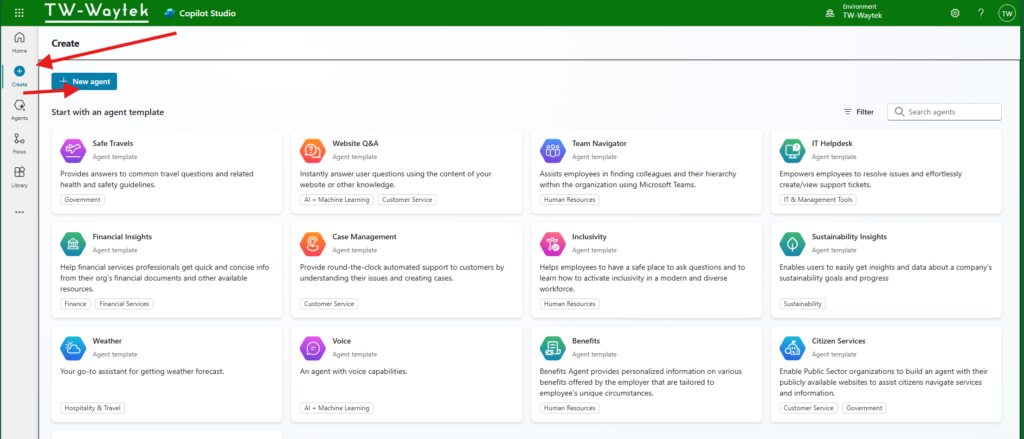
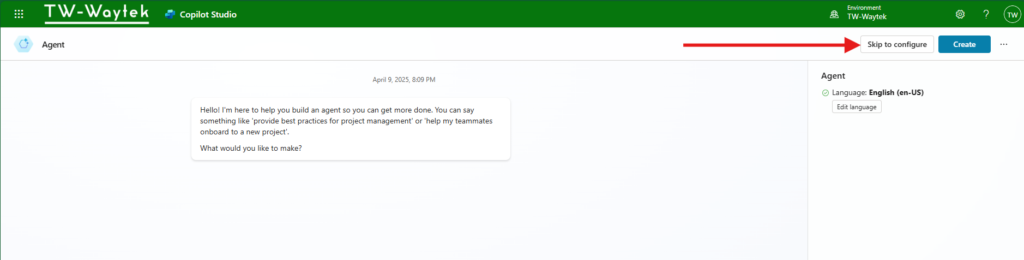
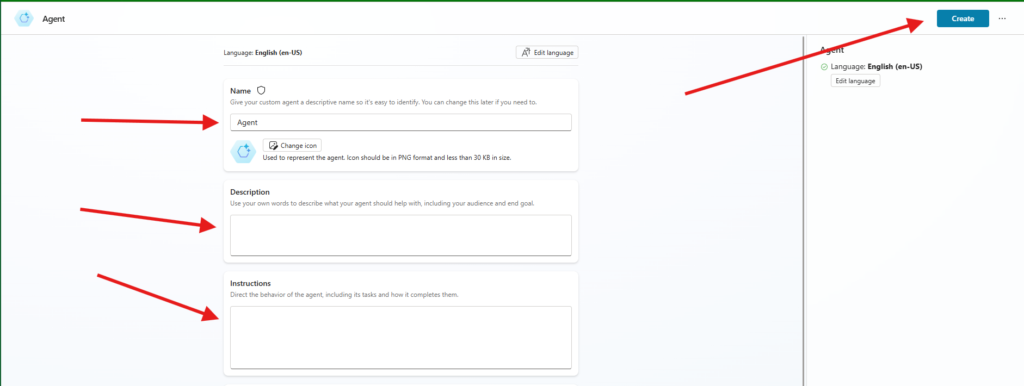
Go to Copilot Studio, select Create, and then New Agent. On the next page, click on Skip to Configure. For the next page give your Copilot a name, provide a description, and then instructions that directs the behavior of the agent. Outside of giving your agent a name, for this demo a description or instructions are not required but still recommended.
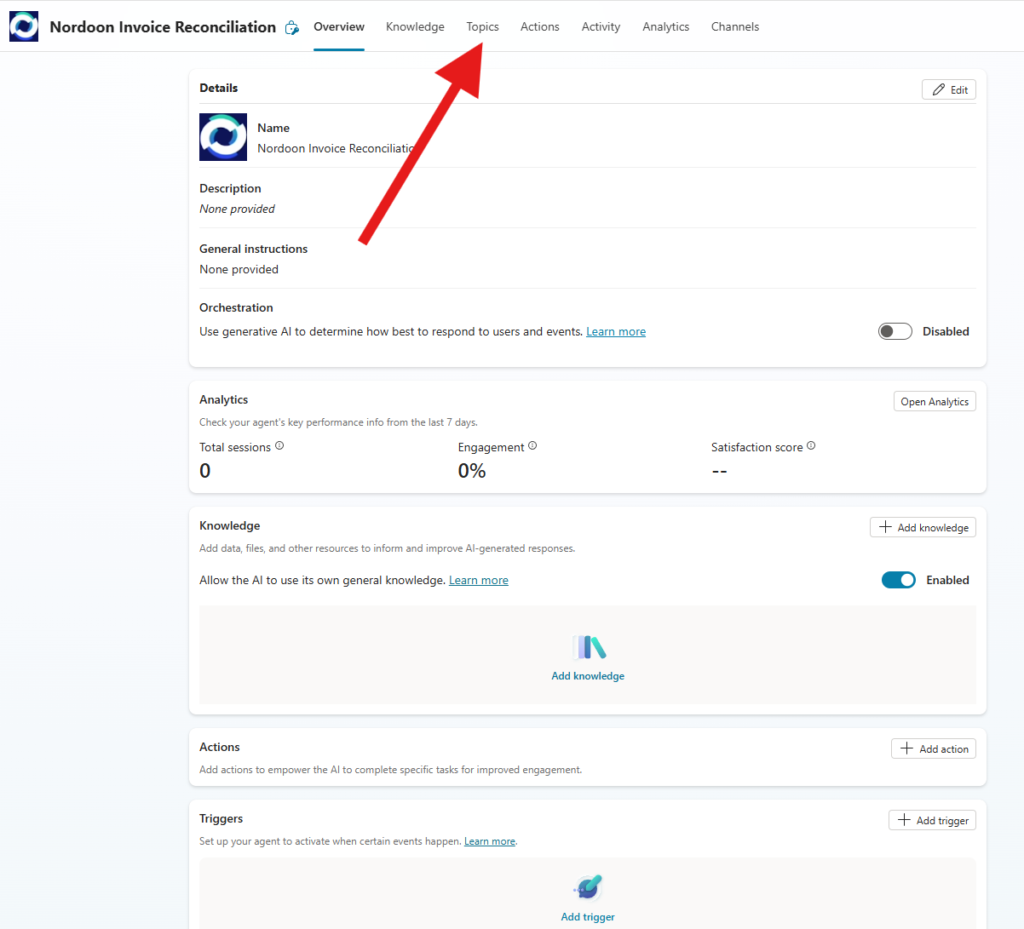
Now that the Copilot Agent is created, click on Topics, this takes you to the Topics page, then click on Add a Topic. Topics allow you to channel conversations within the chatbot.
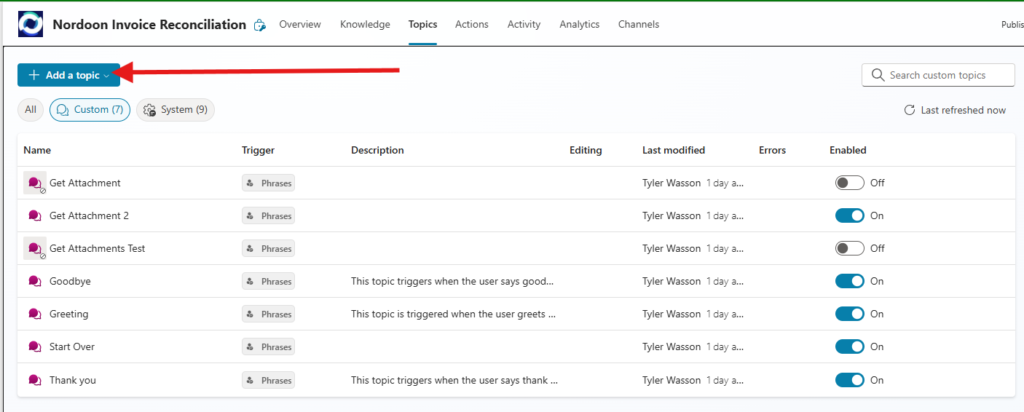
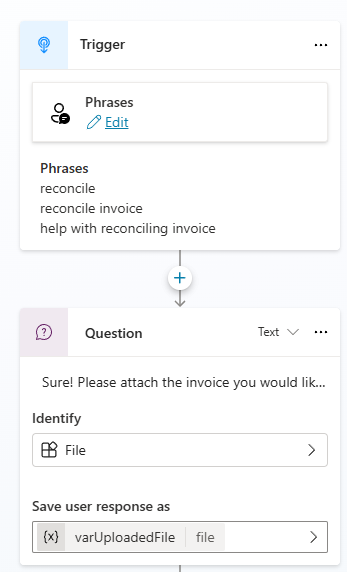
Each topic starts with a Trigger; these are either words or phrases that branch the conversation within the chatbot to this specific topic. Click on the Edit button and add in the trigger words and phrases: “reconcile”, “reconcile invoice”, and “help with reconciling invoice”. When a user says any of these phrases in the chatbot conversation, it will trigger this topic of conversation.
Next, click on the plus button and then select “Ask a Question”, under enter a message write “Sure! Please attach the invoice you would like to reconcile”. Under Identify, select File, the file will be saved to a variable, I’ve renamed the variable to varUploadedFile and is of type “File”.
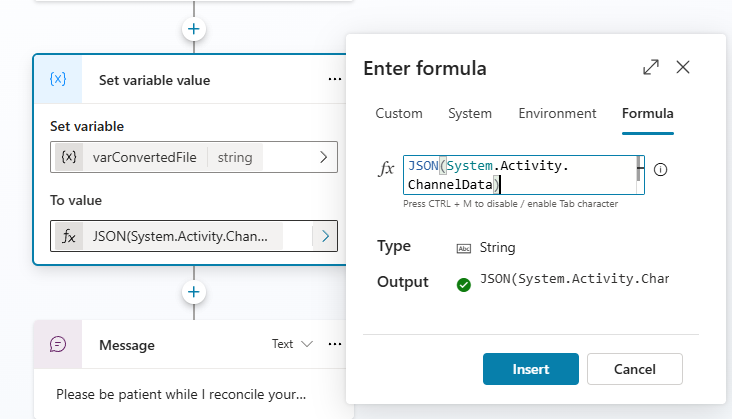
Next, click on the plus button, then select Variable Management, then Set a Variable value. Click on the variable under Set Variable and name the variable to varConvertedFile. Under To Value, select the right facing arrow, then click on Formula, enter the expression below and then click Insert.
JSON(System.Activity.ChannelData)
This expression takes the attached file and converts it to a string which is needed to pass the file to Power Automate.
Next, click on the plus button, then select Send a message. Enter the text “Please be patient while I reconcile your invoice.”
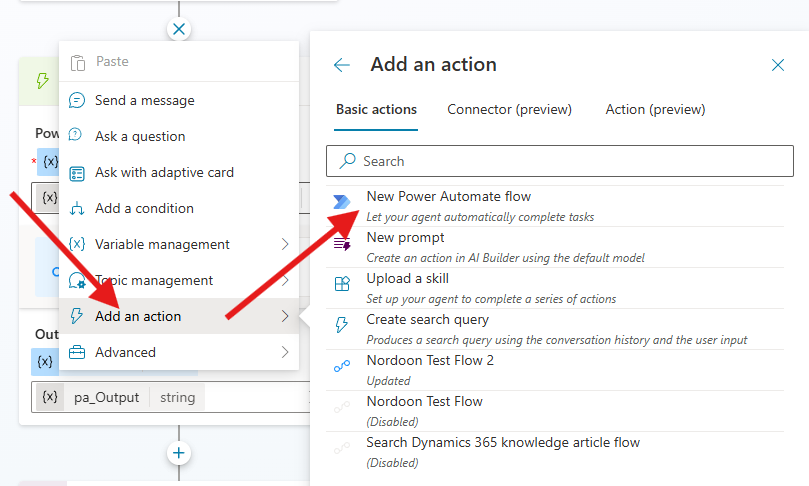
Next, click on the plus button, select “Add an Action” and select a “New Power Automate Flow”. Skip on to Step 2 to configure the power Automate flow, continue directly below to finish setting up the Copilot agent.
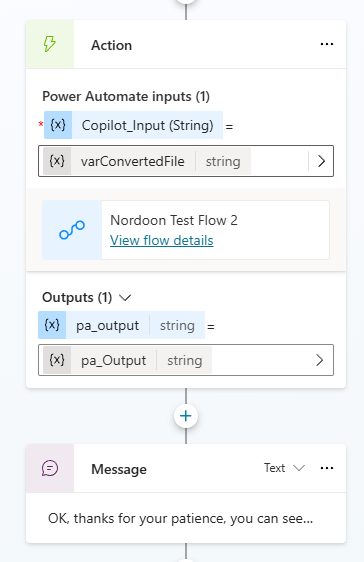
Under the Action card, and for the input being sent to Power Automate, select the variable varConvertedFile. The output will be the name of the output component of the power automate flow.
Lastly, click on the plus sign, then select “Send a Message”. Add the text “Ok, thanks for your patience, you can see your results below.” and under the text add the output variable from the Power Automate flow by selecting the {x} button on the message menu bar.
2) Configure Power Automate Integration
Click here to go back to Overview.
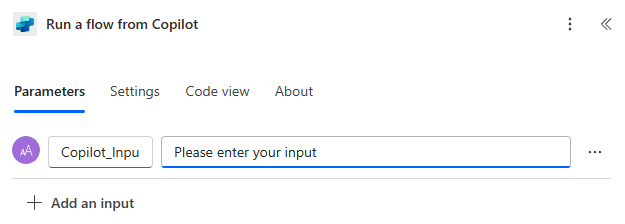
The first action is “Run a Flow from Copilot”, give the input a name and make sure it is a string. I named mine Copilot_Input. Leave the input value blank as it already includes the file from Copilot Studio.
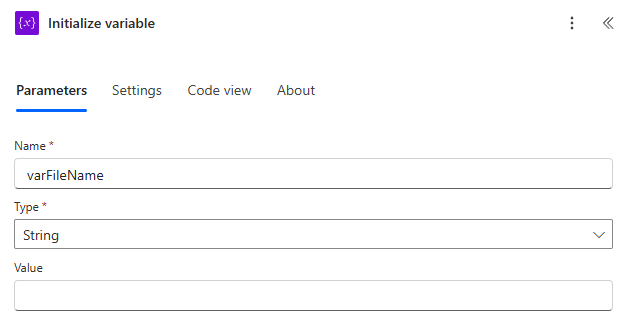
The next action is “Initialize Variable”, give it the name varFileName and select type String. Do not provide a value.
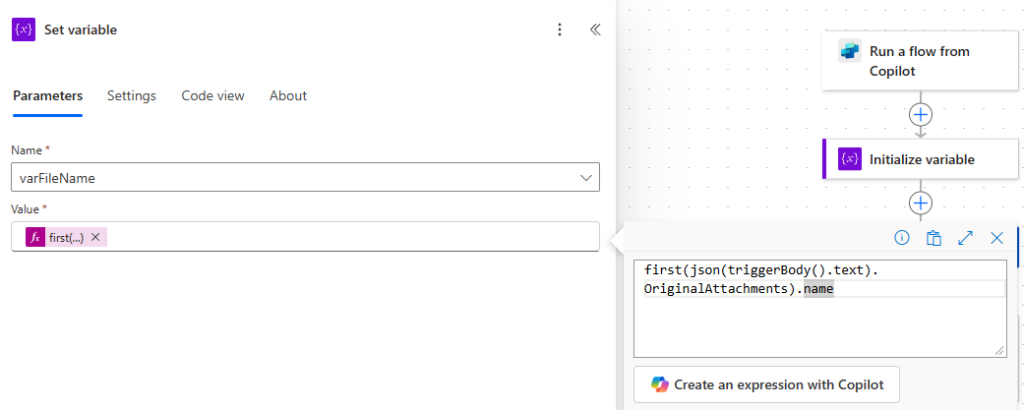
The next action is “Set Variable”. Select the variable name varFileName. In the Value field select to add an expression and enter the details below:
first(json(triggerBody().text).OriginalAttachments).name
This expression extracts the name of the first attachment from the OriginalAttachments array in the JSON object derived from the text property in the content received from the chatbot. In short, we are getting the file name of the file received in the chatbot conversation.
In setting up this flow, I struggled to get the file content from the output directly from the chatbot. But, when you save a file from within a Teams chat, even within a chatbot, the file is saved to your M365 OneDrive account. The default location is always “Root/Microsoft Teams Chat Files/FileName.exe”.
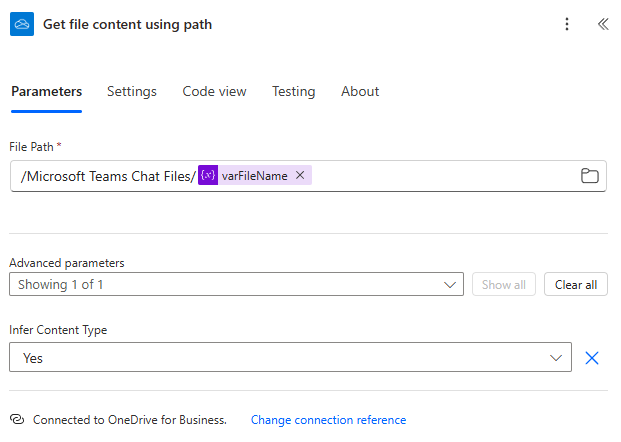
So, to get the file content, add the action “Get File Content Using Path” under OneDrive for Business. For the File Path, add the path /Microsoft Teams Chat Files/. Then select Dynamic Content and under “Variables” select varFileName.
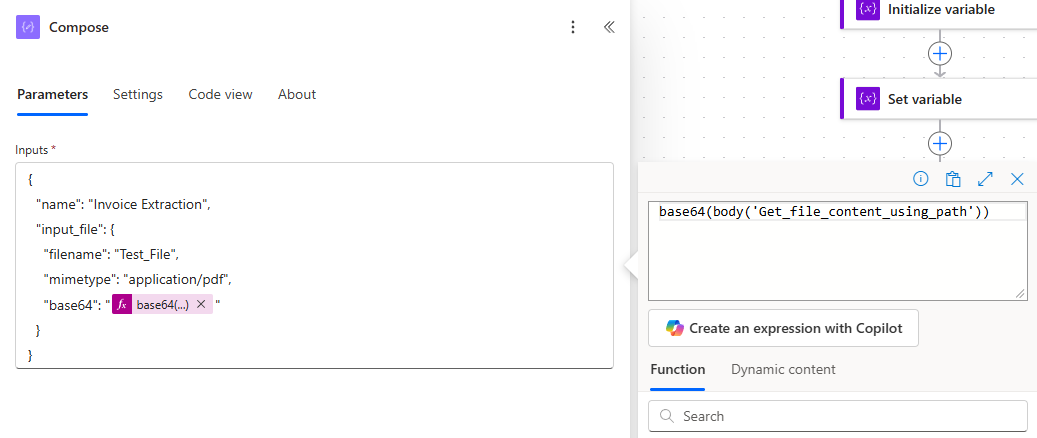
Next add a “Compose” action. Add the JSON script below, it is required for the next step. For the base64 line, make sure to add it as an expression using base64(body(‘Get_file_content_using_path’)). This will convert the file content to base64. The AI service requires the content to be in base64 in order to receive it.
{
“name”: “Invoice Extraction”,
“input_file”:
{
“filename”: “Test_File”,
“mimetype”: “application/pdf”,
“base64”: “base64(body(‘Get_file_content_using_path’))”
}
}
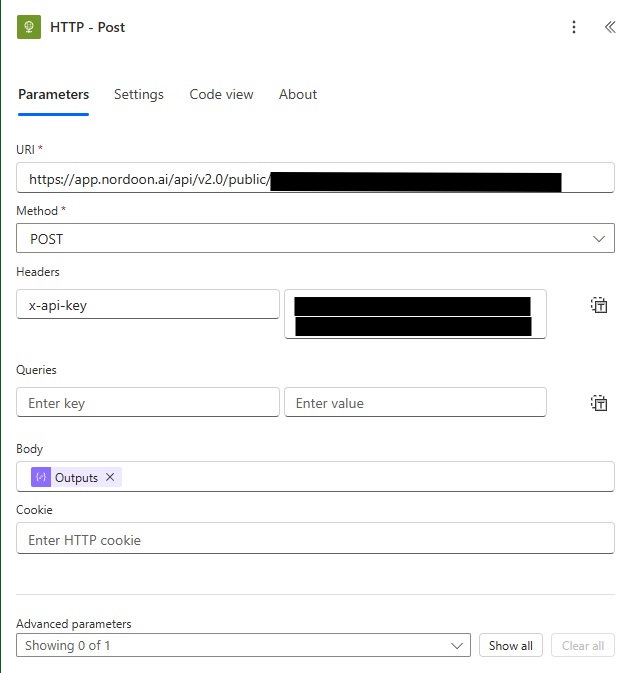
Next add an “HTTP Post” action, here you will need the URL of the API endpoint of the Nordoon AI service Invoice Reconciliation template. Select Post as the method to send the file to the AI service. Under the header type “x-api-key” and provide the token to access the template. Under Body, add the output from the previous compose action as dynamic content.
Click here to get the API details for the Nordoon service.
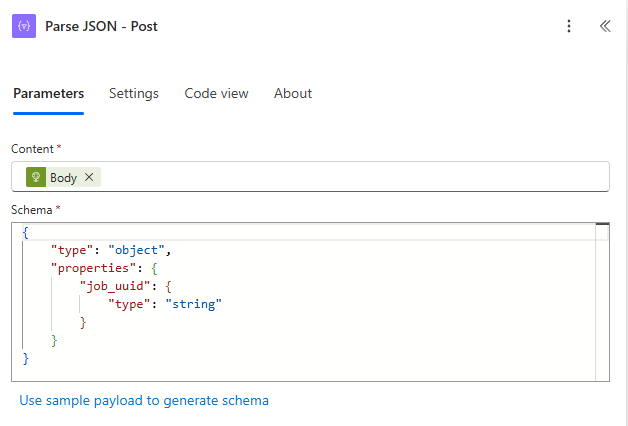
Next add a “Parse JSON” action and name it “Parse JSON – Post”. When sending a Post request to the Nordoon service API, it sends back a response. We want to grab the job ID from the response. Under Content add the body of the HTTP – Post action in Dynamic Content. For the schema add the following JSON script to get the Job ID called “job_uuid”.
{
“type”: “object”,
“properties”:
{ “job_uuid”: {
“type”: “string”
}
}
}
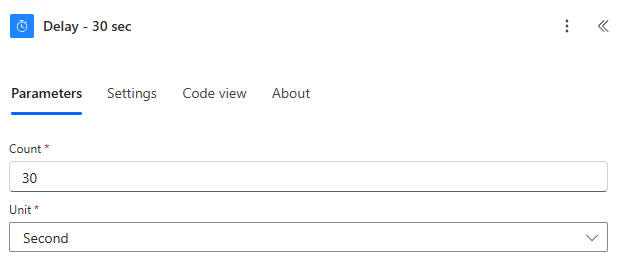
Next add a 30 second delay. To do this add a Delay action, set the count for 30 and the unit as Second. This is to give enough time to process the invoice reconciliation.
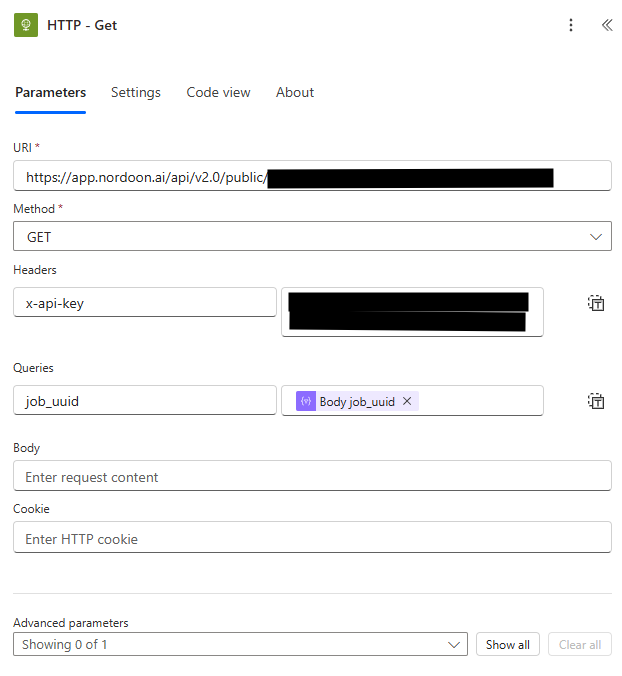
Next add an “HTTP Get” action. Use the same URL as you did in the HTTP Post action, this time select Get as the method. Use the same header and token. For Queries enter “job_uuid” and in the next field add the dynamic content from Parse JSON – Post Body job_uuid. This will grab the results of the invoice reconciliation based on the template job ID.
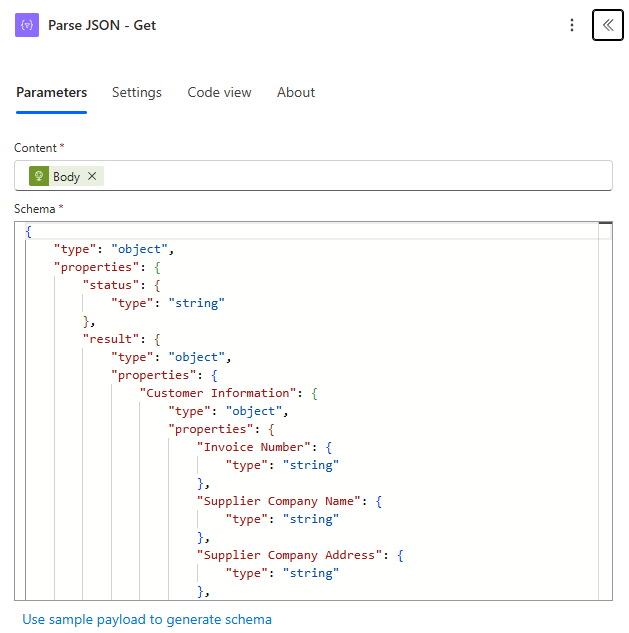
Next add a “Parse JSON” action, under Content select the body from the HTTP – Get action in Dynamic Content. You will need to test the entire process before you are able to get the JSON results of the HTTP – Get action to generate the JSON schema. Finish out the rest of the automation, run it and get the output from the HTTP – Get action in the results. Below is the schema based on my Nordoon template.
To see the full JSON schema click here.
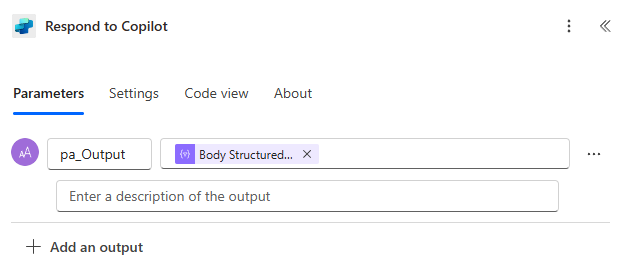
The last action should already be there, called Respond to Copilot and here you can name the output, I called mine “pa_Output”. The Output should already be a string and in the next field select Dynamic Content under Parse JSON – Get select Body Structured Email Reply. This will provide the summary results of the reconciliation. This will be passed back to the chatbot and saved in a variable.
3) Setup Nordoon AI Service
Click here to go back to Overview.
If you have not used Nordoon.AI before you can sign up for a free account at this link: Nordoon | Customers to get started.
A template is instructions for the agent and uses the words and structure of the template to extract information and even perform calculations which we will demonstrate in this case.
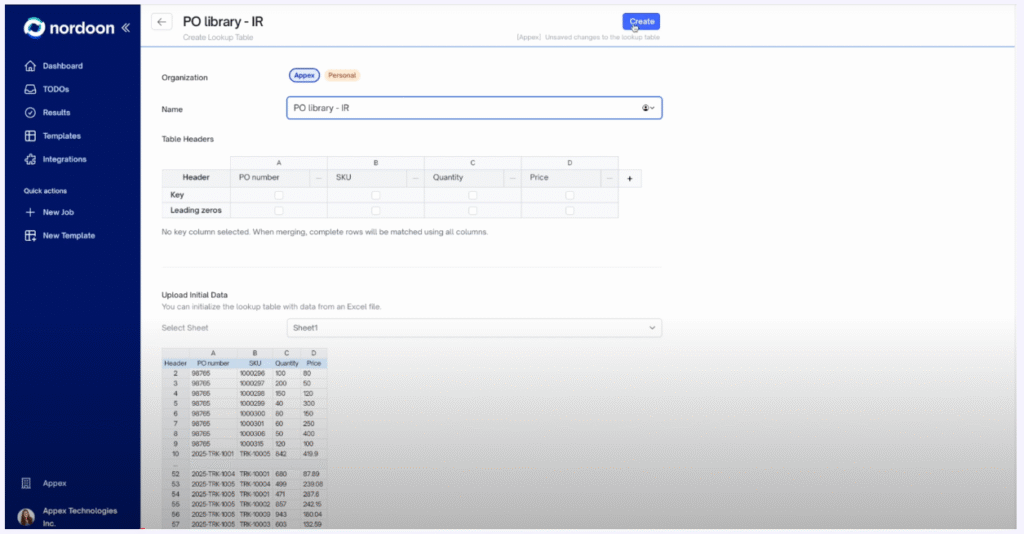
First, go to Integrations and then select Lookup Tables.

Give your Lookup Table a name, mine is “PO Library – IR”. Next create a table based on the table headers matrix. Add a Title to column and select the + button to add more columns.
You will need to upload a file or manually add purchase order data to compare against an invoice. My table has four columns: PO Number, SKU, Quantity, and Price. You can then upload an Excel file with data based on this table structure. Then click on Create.
You could also set it up to refresh the PO data using Power Automate or even connect directly to your ERP, but that is for another day.
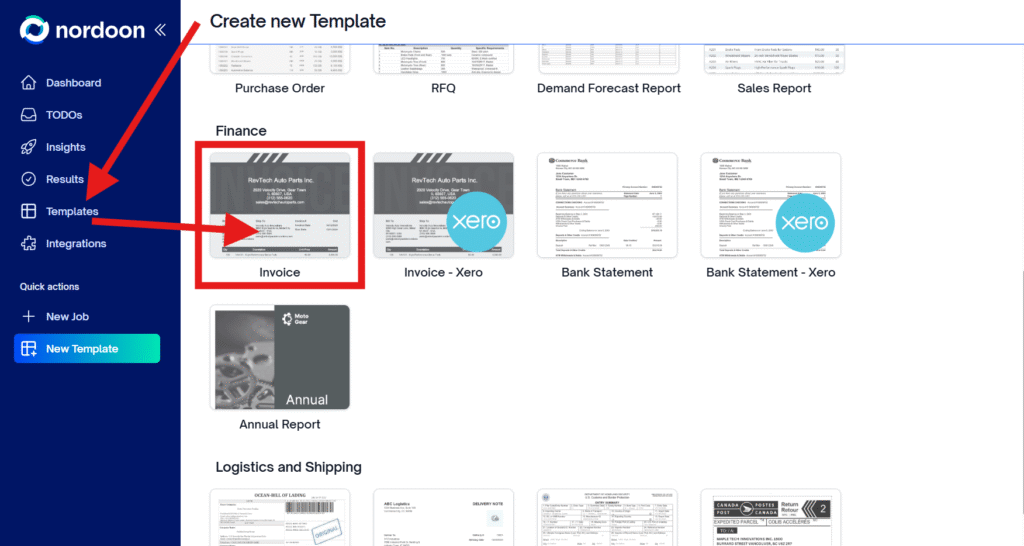
Next, on the sidebar select Templates and scroll down to Invoice.
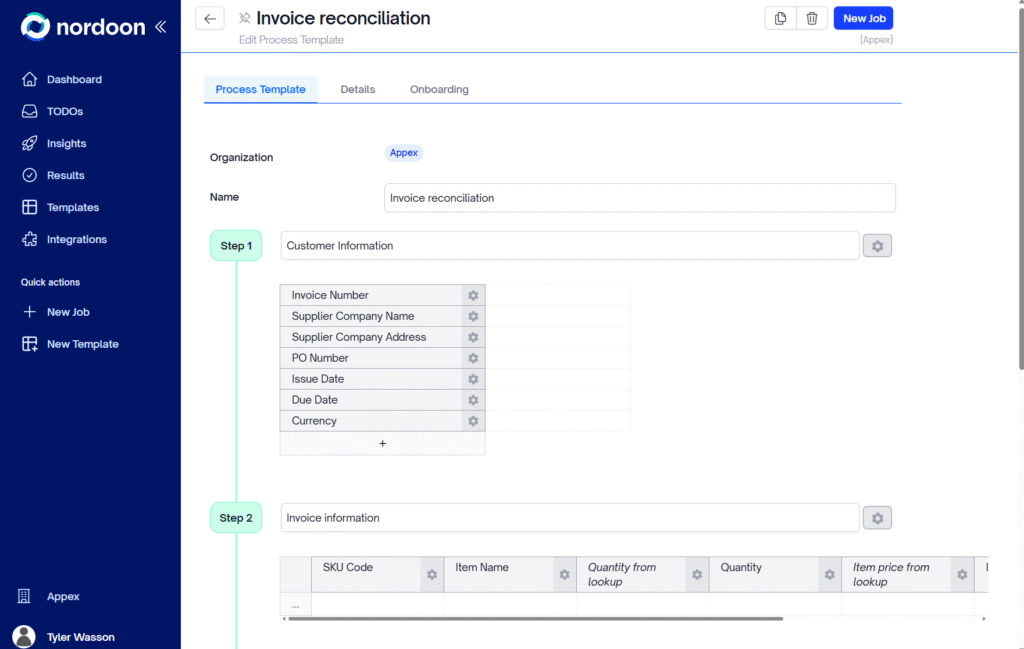
Give your template a name, I’m using “Invoice Reconciliation” and then select Create. Go back into the template to further edit it. For Step 1 under General Information, update/add/remove the Invoice information you are looking to capture. In my case, I’m grabbing the Invoice Number, Supplier Company Name, Supplier Company Address, PO Number, Issue Date, Due Date, and Currency.
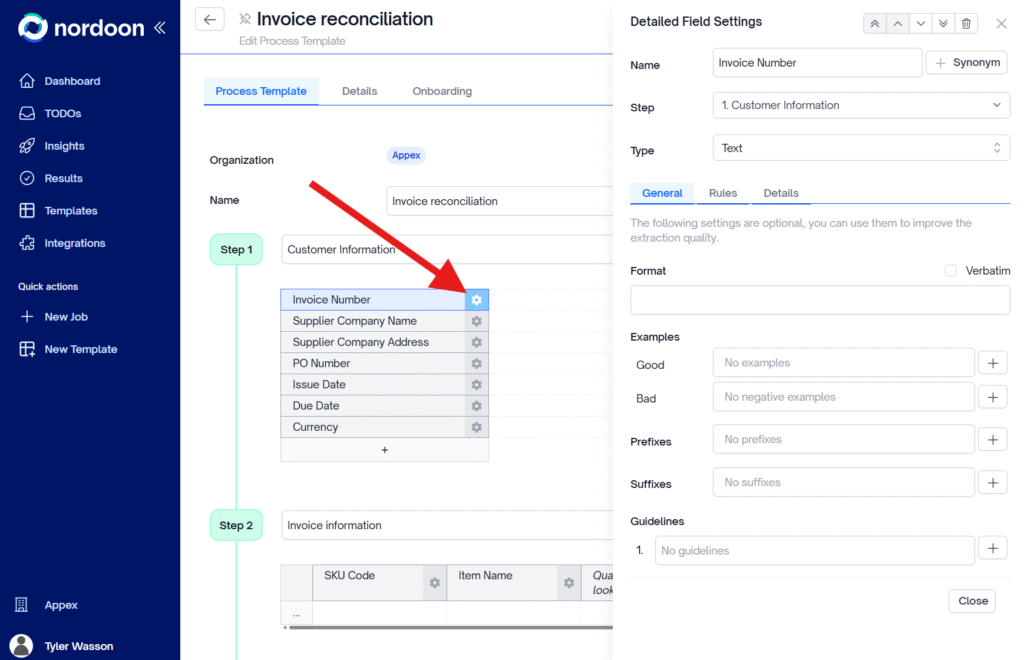
How you write the column headers is important as it affects what the AI service will look for in the document. You can update the settings of column by clicking on its gear icon. You add synonyms or add good or bad examples of what the AI service needs to look for.
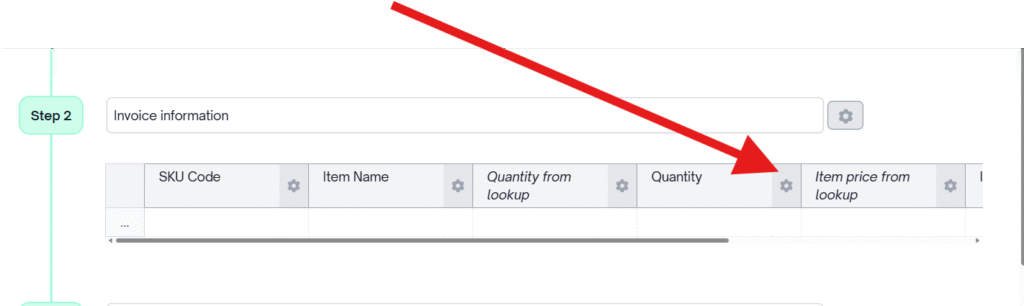
For Step 2, rename it to “Invoice Information”, then add/update/remove the invoice line items based on the data you want to capture. Like in Step 1 and the other steps going forward how you write the column titles matters and can be edited using the gear icon.
For my example, the column names are SKU Code, Item Name, Quantity from Lookup, Quantity, Item Price from Lookup, Item Price, and Total Price.
Setup the column “Quantity From Lookup” and “Item Price From Lookup”, to use the Lookup table as a reference.
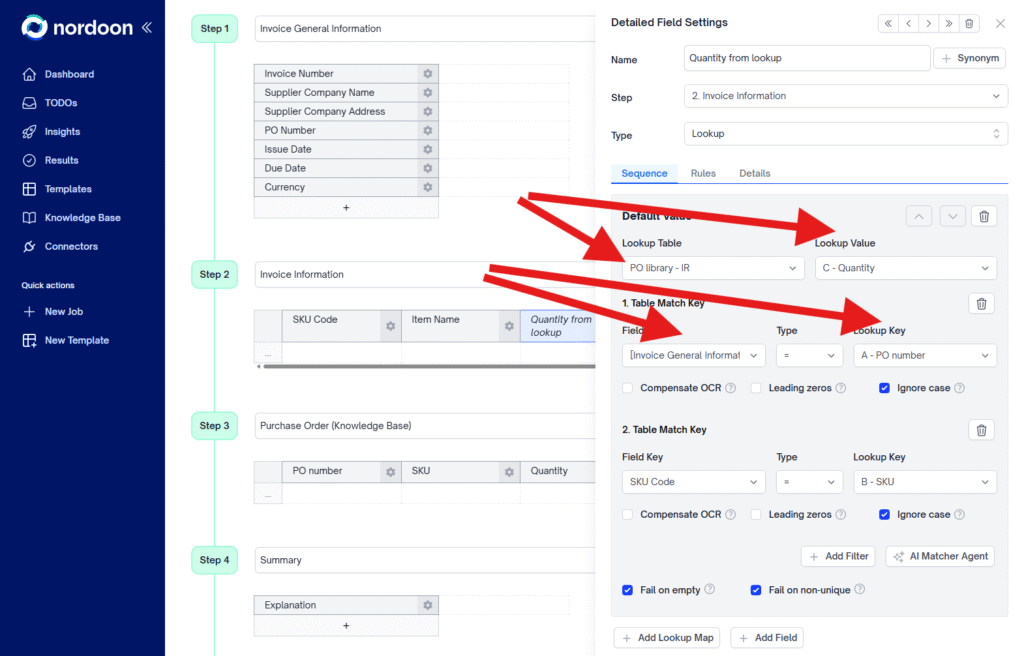
Click on the “Quantity From Lockup” column gear icon, change the Type from Text to Lookup.
Under the Sequence tab, select the button “Add Lookup Map”.
Under Lookup Table select the name of your lookup table, in my case it’s PO Library-IR, then select C-Quantity under Lookup value.
Under 1. Table Match Key, look for the drop down called Field Key. This section will help us reference the lookup table against the Purchase Order we submit. Select Step 1 Purchase Order called [General Information]PO and the lookup key as A – Purchase Order.
The rest of the form you can leave as is.
Do the same for “Item Price From Lookup” but change the lookup value to Price, all else should be the same.
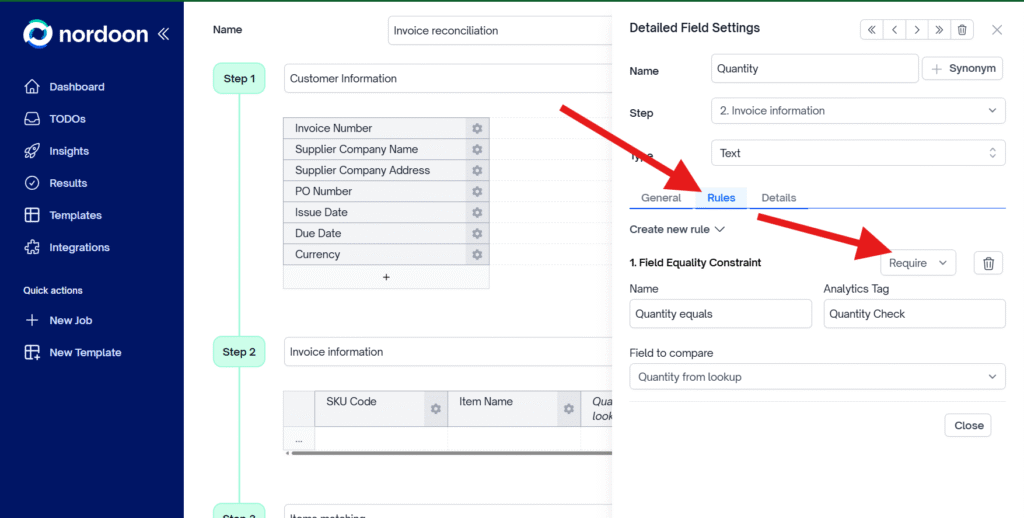
Next you need to add a rule for the Quantity and Item Price field. Select the settings button for each, select the rules tab, and create a Field Equality Constraint. Click on the drop down next to Field Equality Constraint and select Required. Under Name put “Quantity equals” or “Price equals”.
This will provide a flag when there are discrepancies.
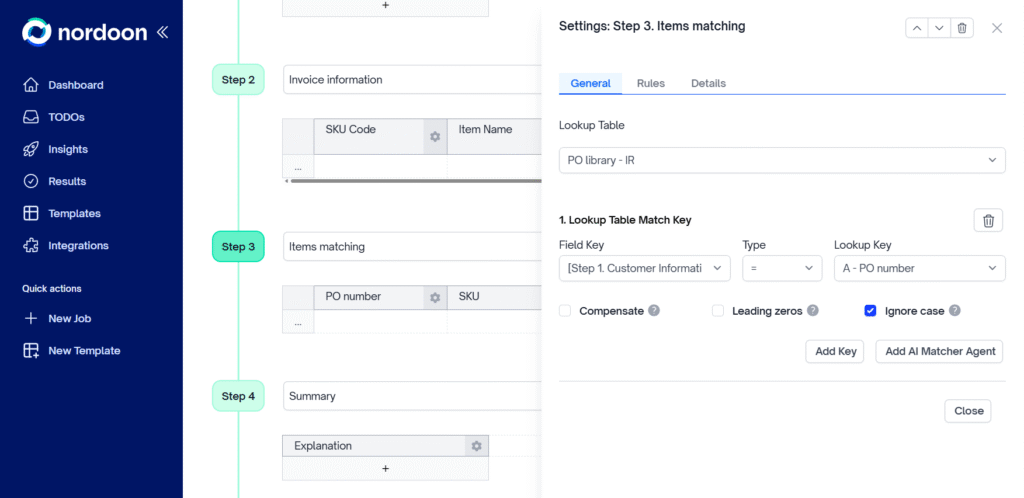
Create a new step by selecting “Add Another Step” next to the green Done bubble and select the Lookup Table option. This will create Step 3 and rename it “Items Matching”.
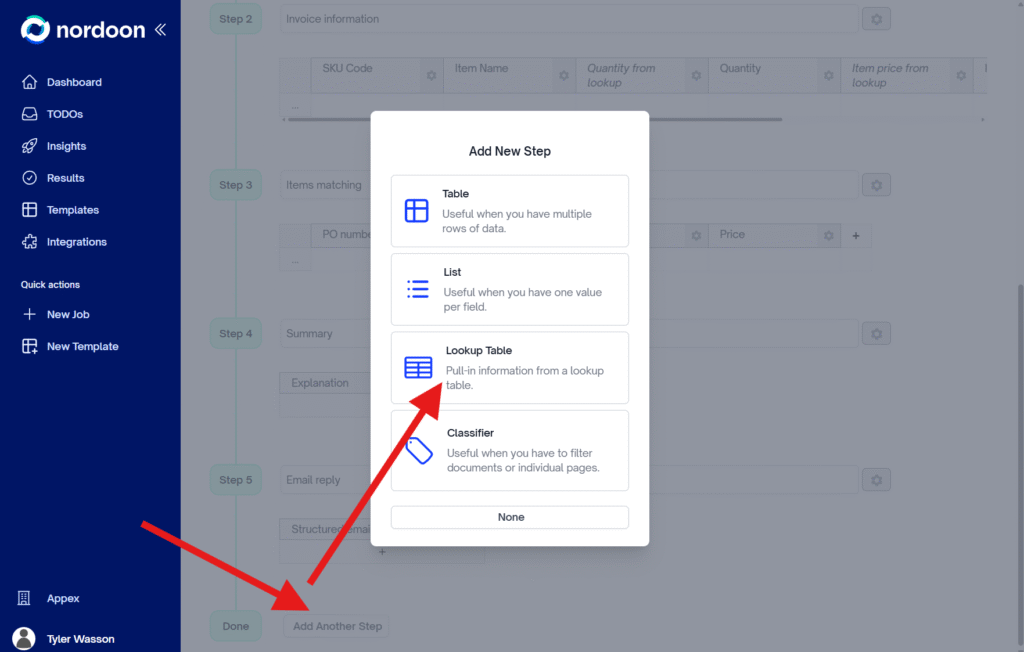
Select the settings icon to set it up.

Under Lookup Table select the lookup table for this automation then select the “Add Key” button. In the field key select Step-1-General-Information-PO-Number and for Lookup Key select PO Number, then click on “Close”.
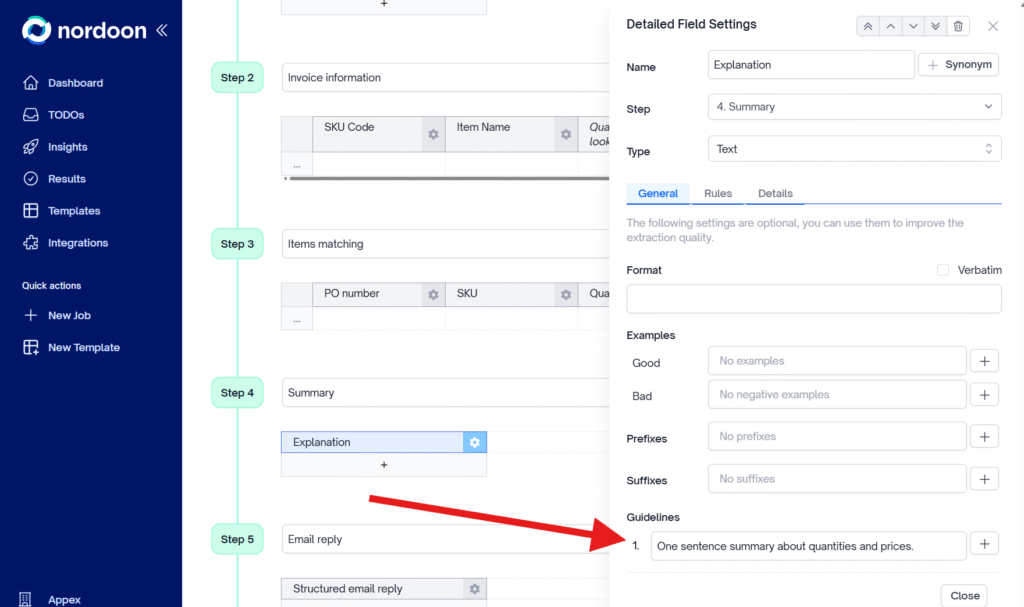
Next to the green Done bubble, click on the “Add Another Step” button to create a new step and select “Table”. This will create Step 4, name it “Summary” and then provide the title “Explanation” to the single column and save the changes.
Go to the settings for Summary, go to Context, and click on “Add Step”. Under Title write in “Invoice Information” and under Base Step select “Invoice Information”.
Select the setting icon for the column Explanation, at the bottom under Guidelines write in “One sentence summary about quantities and prices”. Save your changes.
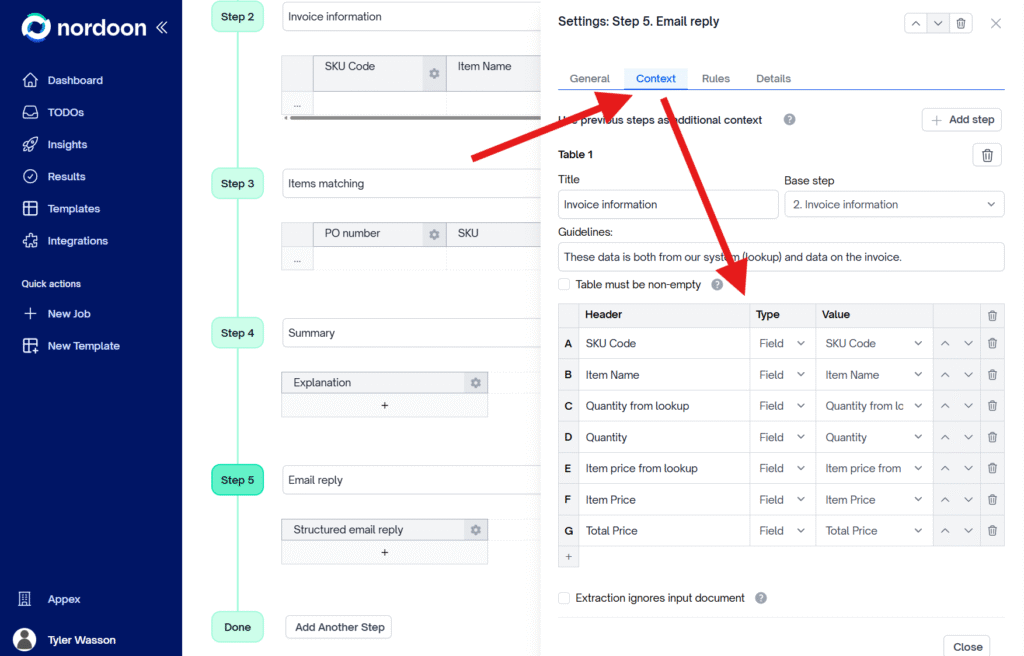
Add a new step, Step 5, and select another List and name it “Email Reply”, name the column “Structured Email Reply” then click Save.
Select the settings icon and under the Context tab add a step.

For the Title enter “Invoice Information” and for Base Step select Number 2 Invoice Information.
Under Guidelines enter: “This data is both from our system (lookup) and data on the invoice.”
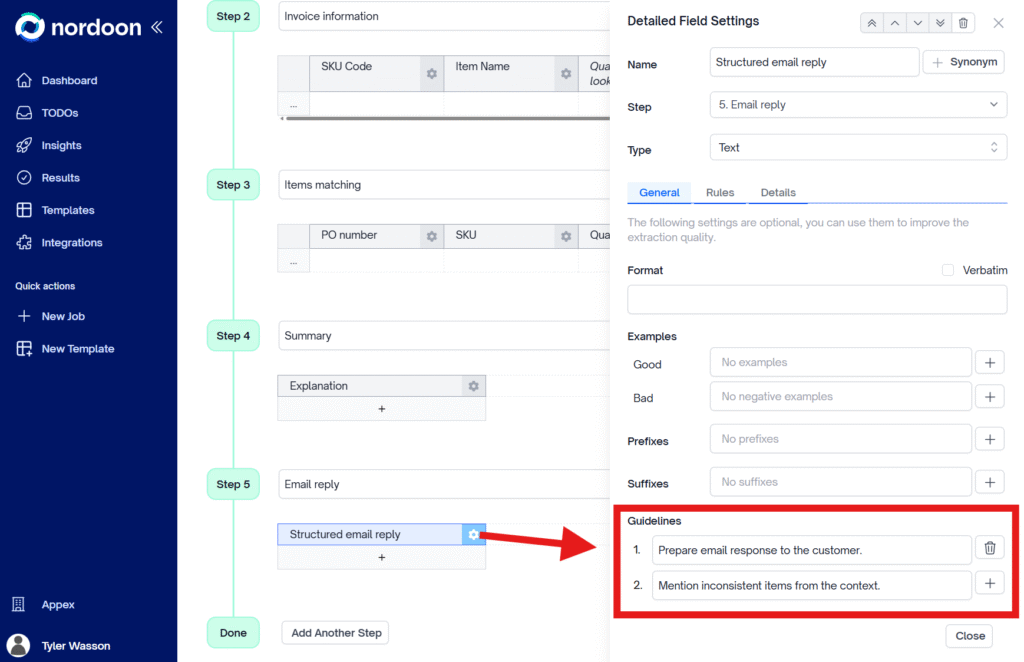
Go to the Settings icon on the Structured Email Reply column, under the General tab go to Guidelines and add the following two statements:
- Prepare email response to the supplier.
- Mention inconsistent items from the context.
Nordoon API Access and Setup
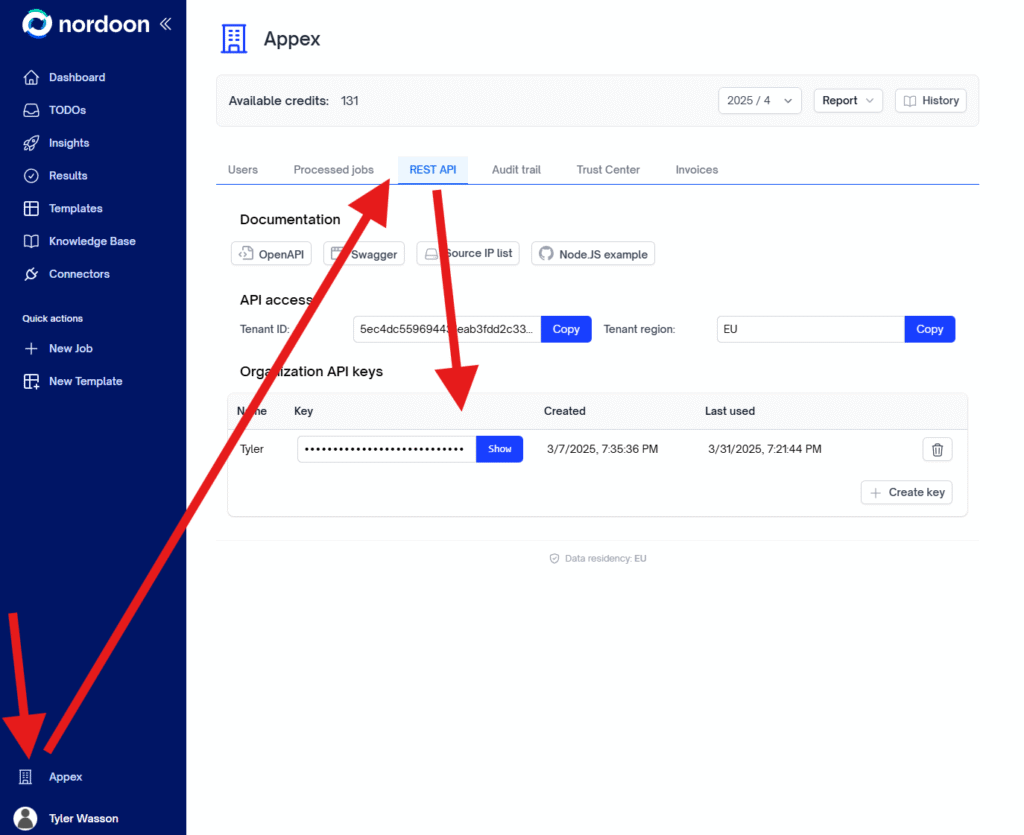
Click on your company link in the lower left-hand corner of the site. Then click on the REST API tab, under Organization API keys select the “Create Key” button. This will generate your API key.
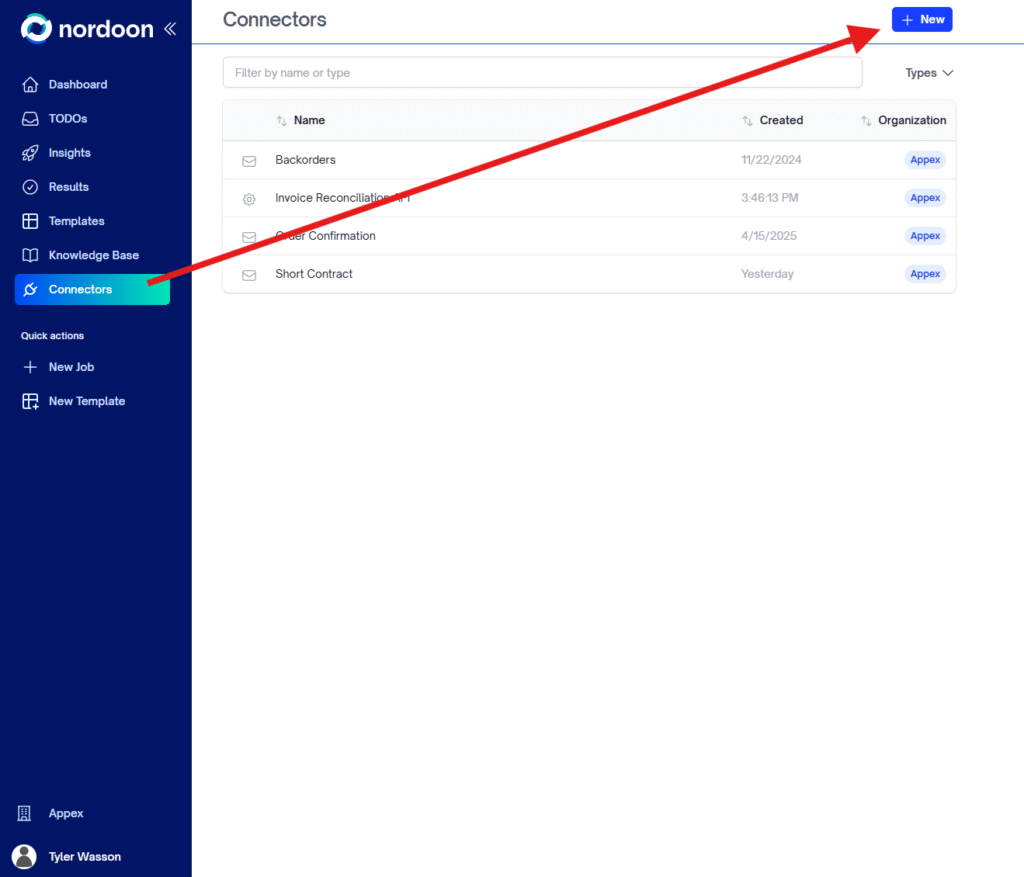
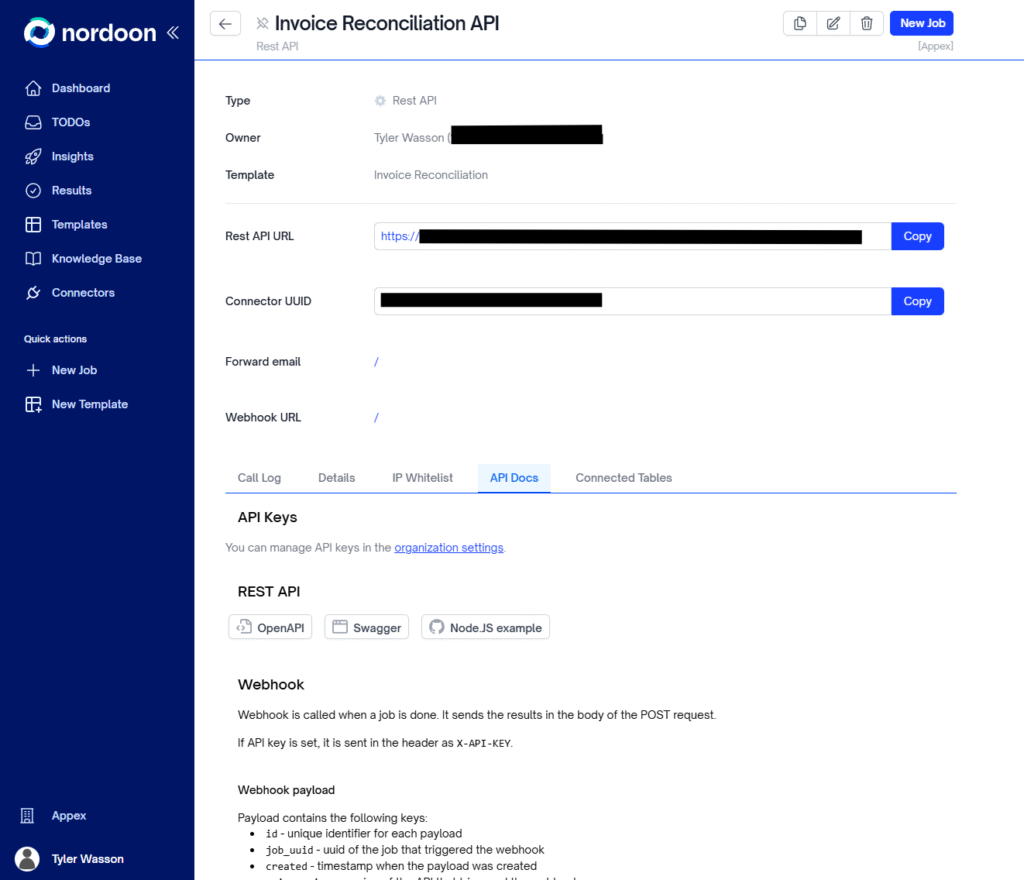
Next, go to Connectors, formally Integrations and click on the “New” button. Select Rest API, give your API connection a name, select the template to use in this API, then click on “Create”.
This will take your API connection and provide the REST API URL as well as API details under the API Docs tab.
Click here to go to HTTP Post.
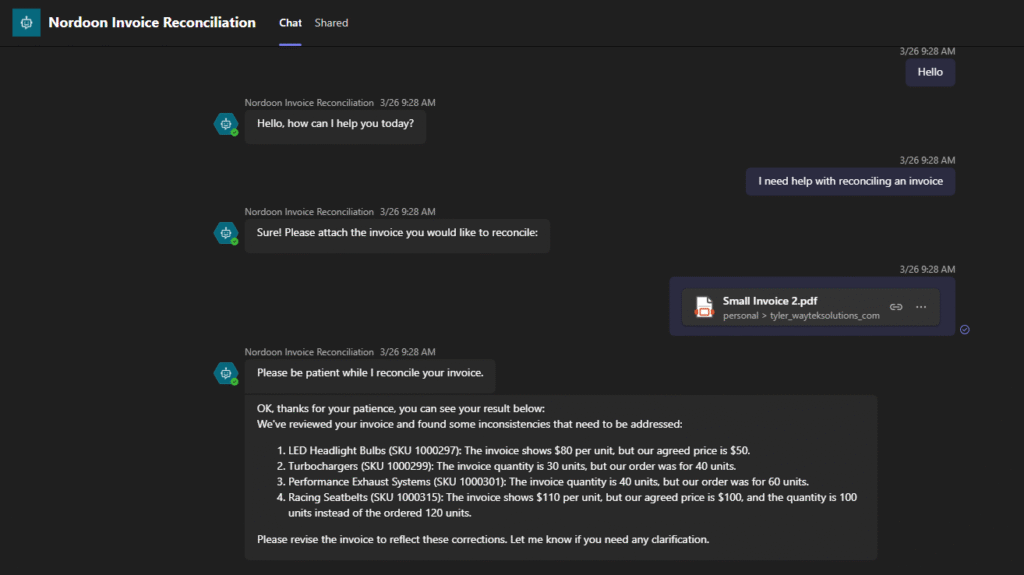
The Result
Below you can see what the conversation with the chatbot looks like and the result from reconciling the invoice. You can see the invoice details here.
Conclusion
Creating a Copilot Agent to reconcile invoices using Copilot Studio, Power Automate, and Nordoon.AI is a transformative approach to streamlining supply-chain and financial operations.
Key Takeaways:
- Copilot Studio: This tool allows for the seamless integration of various data sources and workflows, ensuring that your Copilot Agent can access and process the necessary information.
- Power Automate: By leveraging Power Automate, you can automate repetitive tasks, reducing manual effort and minimizing errors. This integration is crucial for maintaining a smooth and efficient reconciliation process.
- Nordoon.AI: The AI capabilities of Nordoon.AI bring advanced data analysis and decision-making to the table, enabling your Copilot Agent to handle complex reconciliation scenarios with ease.
By combining these powerful tools, you have created a robust system that not only reconciles invoices accurately but also saves time and resources. By Embracing these advancements in AI and automation further enhance your workflows and achieve even greater efficiency in your supply-chain and financial operations.