After receiving many comments from two previous posts based on Vacation Trackers in SharePoint, one such area of interest is around automating the calculation of time off that includes factoring in weekends and holidays. This is what we are going to tackle in this post.
The two previous vacation tracker posts are below:
SharePoint Team Vacation Tracker
5 Big Enhancements to a SharePoint Vacation Tracker in Microsoft Lists
The End Result: Vacation Tracker SharePoint List
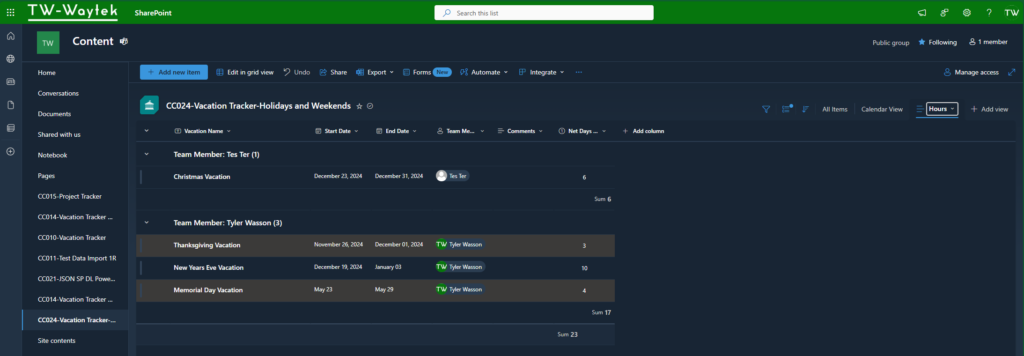
The vacation tracker will have 4 columns used to track time off that are updated by Power Automate.
- The Total Days Off Column is the difference between the Start Date and End Date
- The Workdays column is the total number of weekdays between the Start Date and End Date not including weekends.
- The Holidays column is the total number of holidays between the Start Date and End Date
- The Net Days Off column is the difference between the Workdays column and Holidays column.
The image below shows the All Items view of the finished product.

The image below shows the Hours view of the finished product.
Catch my video on this blob post below:
Stop Infinite Loops When Updating the SharePoint List
This flow will create an infinite repeat loop when the first change is made to the list but there are steps that can be taken in SharePoint to prevent this from happening. I came across the solution from Scott Shearer’s blog which you can access here for reference. These next steps are based off of his blog and adapted for this List.
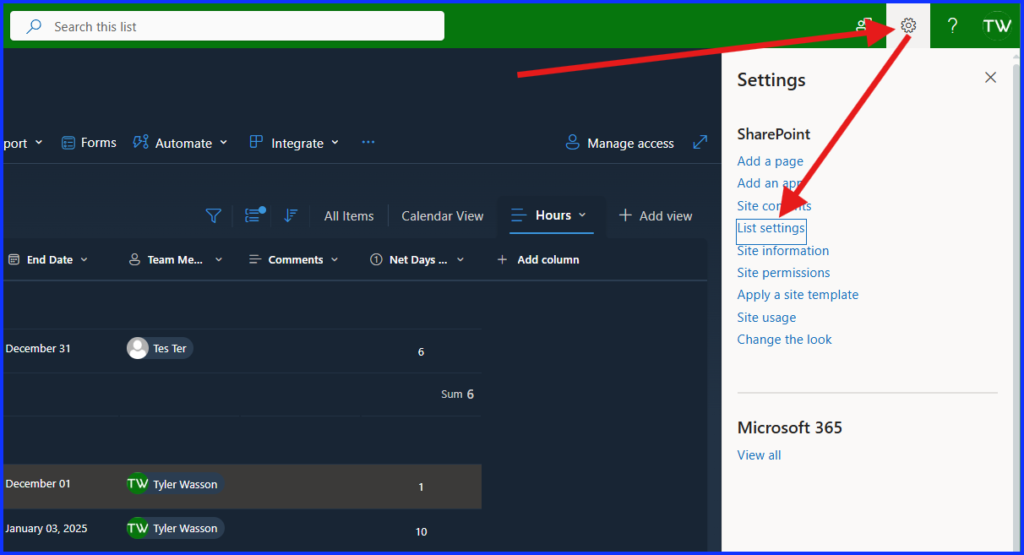
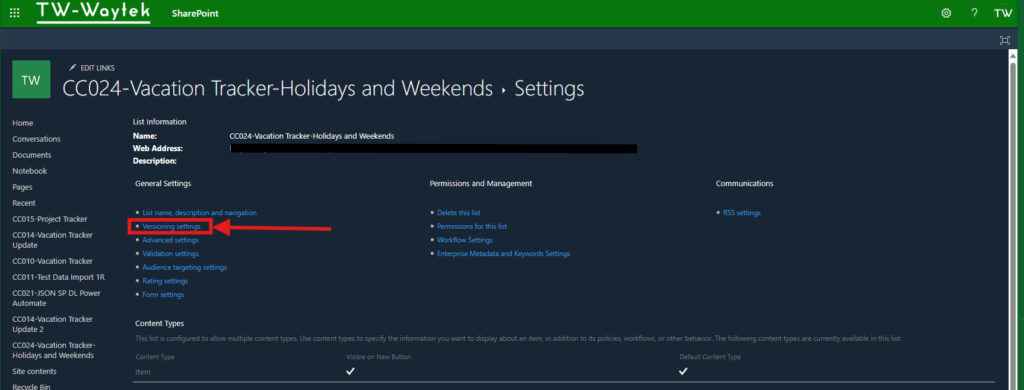
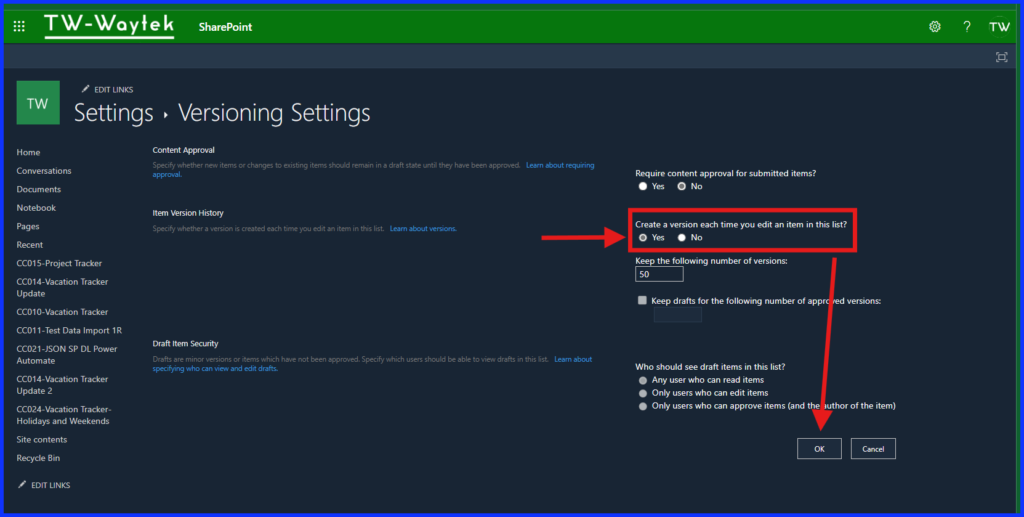
Step 1: Turn on list versioning:
Go to List Settings, then click on Versioning Settings, then select “Yes” to “Create a version each time you edit an item in this list?”, then click “Ok”.
Next, we are to create a new column, from the SharePoint Settings page go to “Create Column”. This column is our Append Text column.
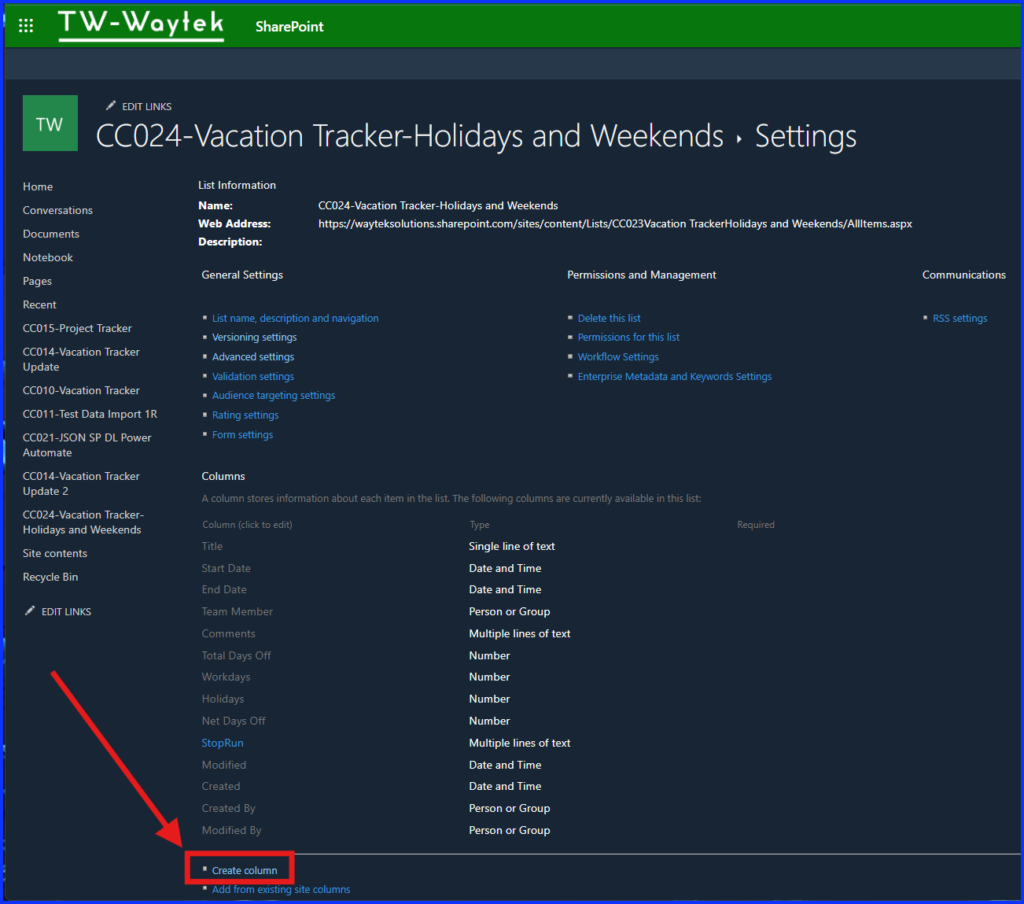
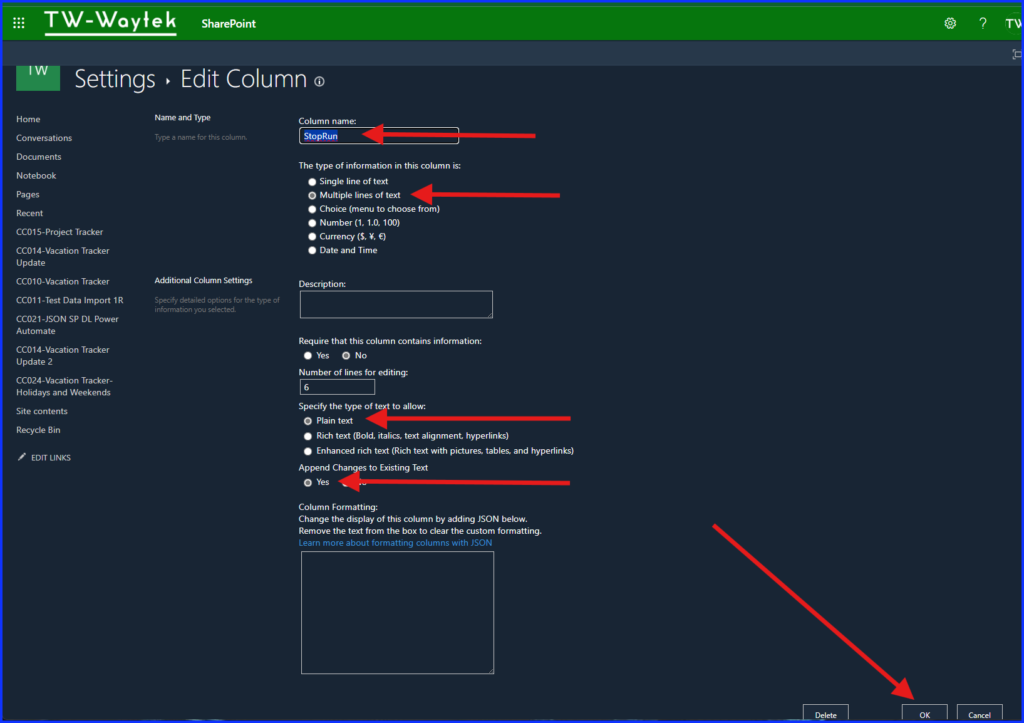
The steps below are for the creation of the StopRun column:
- Enter “StopRun” for the column name under the “Column Name” field.
- The “Type of Information in this column” is “Multiple Lines of Text”
- “Specify the Type of Text to Allow” as “Plain Text”
- Make sure “Append Changes to Existing Text is set to “Yes”.
- Then click on “Ok to save the column.
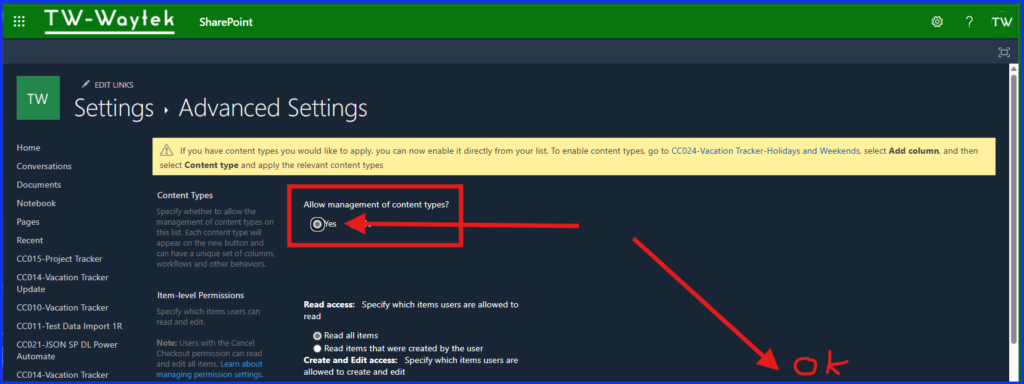
Then from the Settings page, select “Advanced Settings”.

Make sure to change “Allow Management of Content Types” to “Yes”, then select “OK”.
Now from the Settings page, click on “Item”.
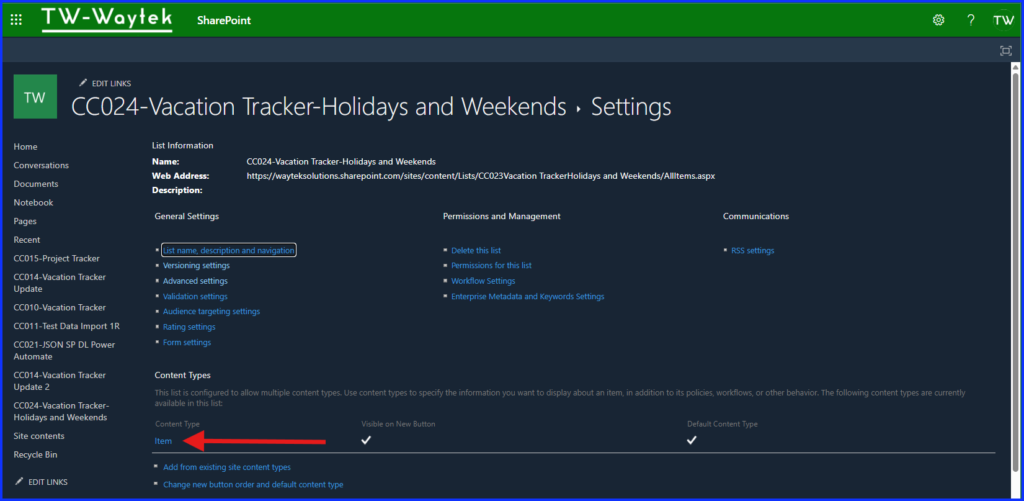
Then click on “StopRun”.
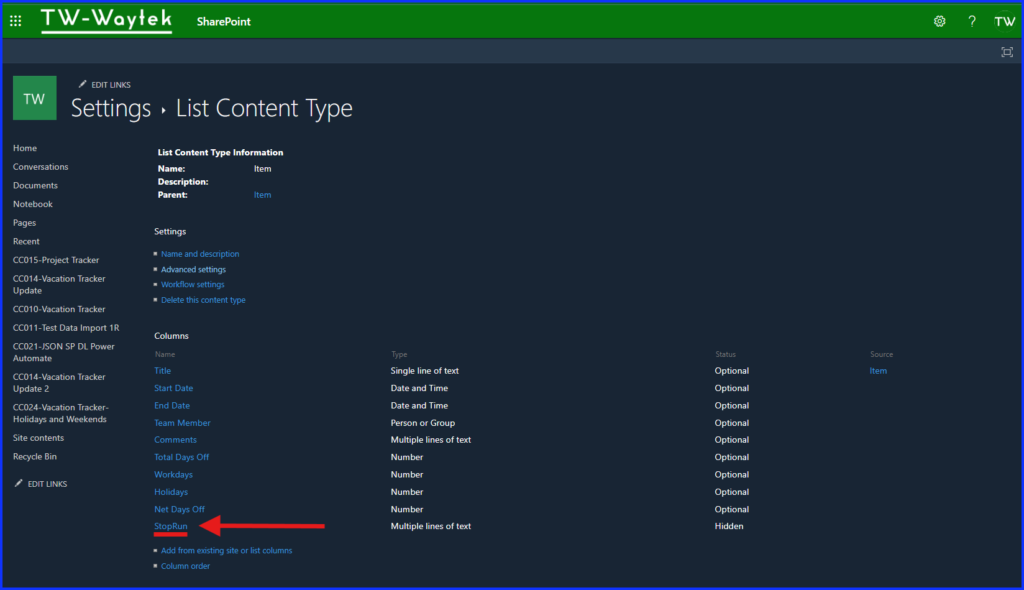
Under “This Column Is:”, select “Hidden” and then select “Ok”.
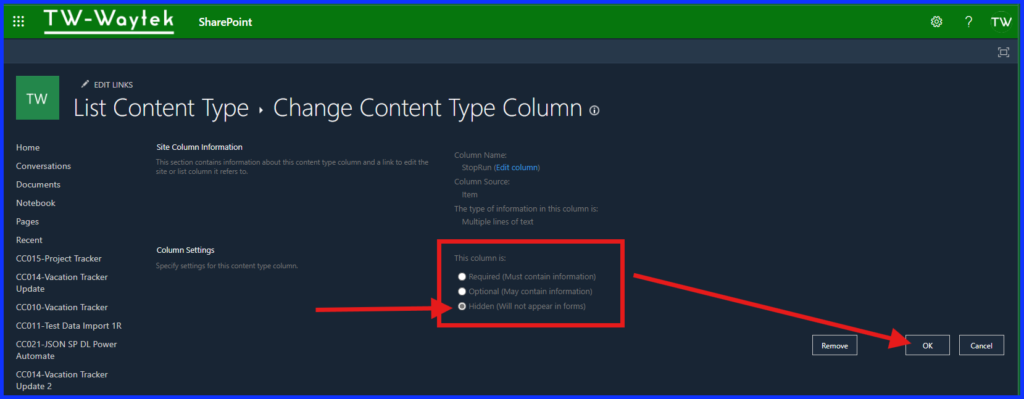
To summarize what we did here, we created a hidden column in SharePoint that is updated by the flow with the value “StopRun” on a new entry or changed entry. We setup the flow in the next step and its trigger will only start if the value in StopRun is null. This will prevent the infinite loop.
Develop Power Automate Flow
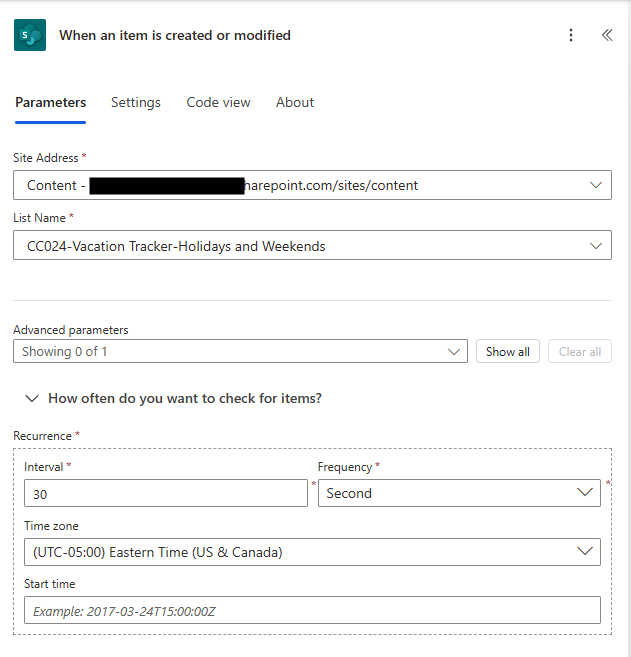
The first action, the trigger, is “When an Item is Created or Modified in SharePoint”. Select the SharePoint site address and the name of the SharePoint List to use for this flow. I’ve updated the recurrence of how often to check for changes to the list to every 30 seconds but it’s entirely up to you and your requirements.
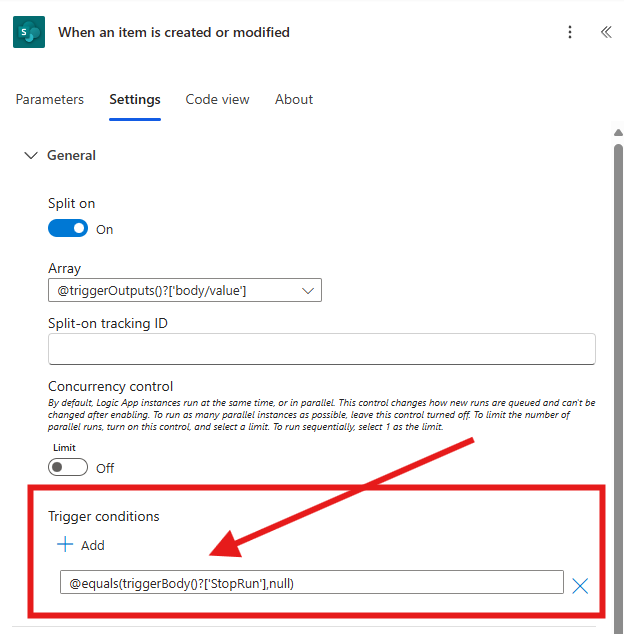
To build on the work in the first part of the blog to prevent repeat loops, update the settings in the trigger by adding the condition below. This means the flow will only run if the StopRun column in the SharePoint List has no value.
@equals(triggerBody()?[‘StopRun’],null)
The next three actions create the main variables for this flow. The first two are coming from the SharePoint List, the vacation Start Date and End Date. The third action is creating an array of holidays to track.
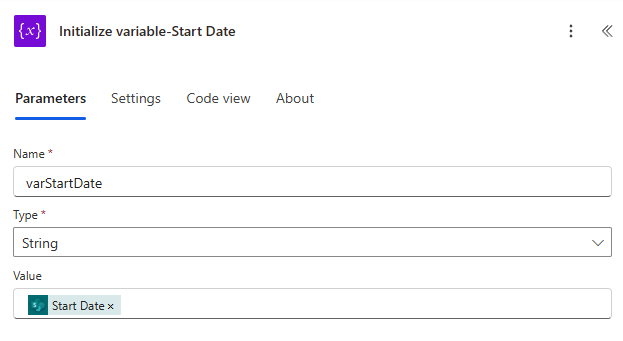
The action Initialize Variable-Start Date creates the first variable based on the vacation Start Date. To do this, find the Initialize Variable action, name it varStartDate, for the Type select “String”, and for the value select the Start Date from the trigger action under dynamic content.
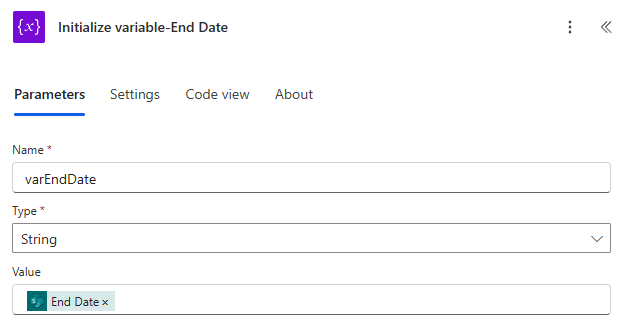
The action Initialize Variable-End Date creates the variable based on the vacation End Date. To do this, find the Initialize Variable action, name it varEndDate, for the Type select “String”, and for the value select the End Date from the trigger action under dynamic content.
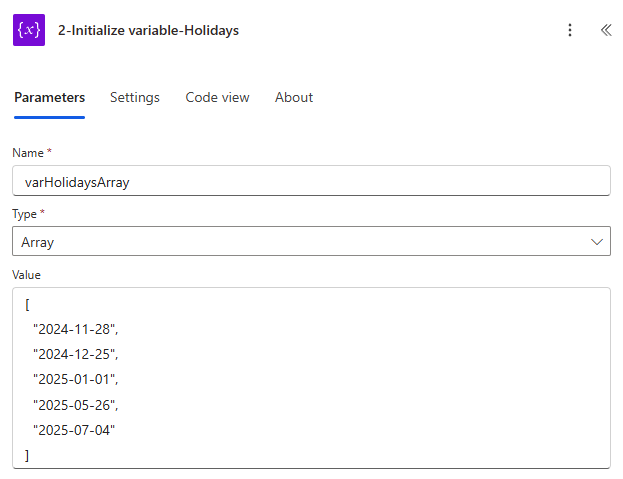
The next action 2-Initialize Variable-Holidays creates another variable but this time it’s an array. To do this, find the Initialize Variable action, name it varHolidaysArray, and for the Type select “Array”. The values start with a hard left bracket, with date values in double quotation marks and separated by a column and ending with a hard right bracket. The date values need to be in the format YYYY-MM-DD.
For simplicity I added a few US Federal holidays for the end of 2024 and the first half of 2025. Someone will need to manually update these values each year for this flow to remain operational. It would be my recommendation to create another SharePoint List where you could maintain the list of federal holidays and retrieve them in the flow.
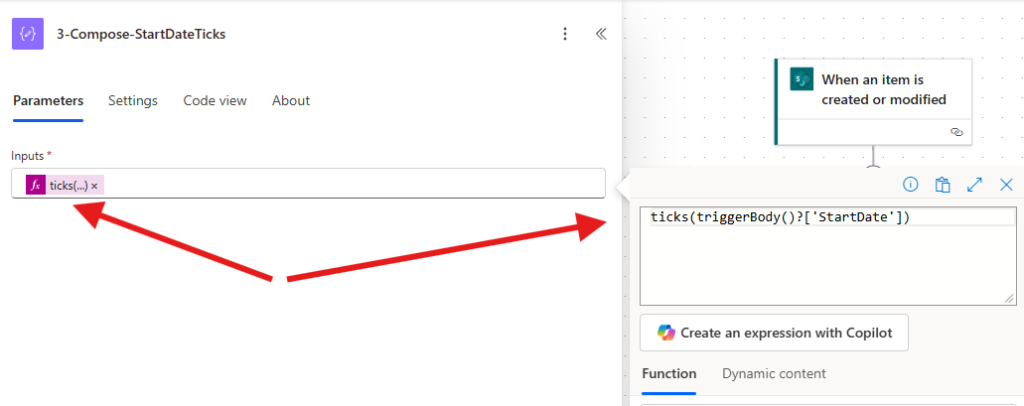
The next action is a compose action and its expression below converts the StartDate field into the number of ticks. Ticks represents the number of 100-nanosecond intervals that have elapsed since 12:00am, January 1, 0001 which is the start of the Gregorian calendar. By doing this we can perform date calculations similar to what we do in Excel by converting the date into a number value starting at 1/1/1900.
ticks(triggerBody()?[‘StartDate’])
The next action is similar to above but for the End Date. See it’s expression below.
ticks(triggerBody()?[‘EndDate’])

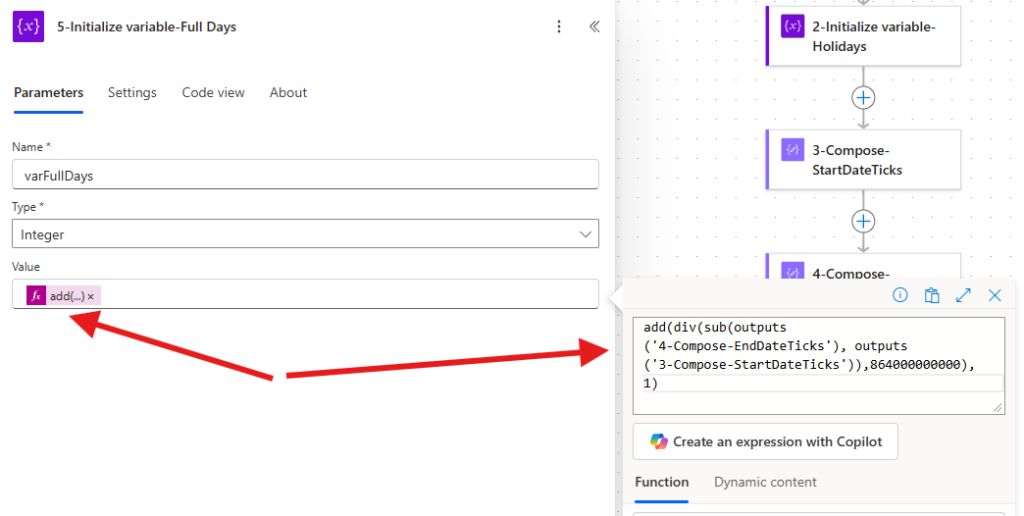
For the next action add an Initialize Variable action, name the action Full Days, name the variable varFullDays, the type is an Integer, and its value is an expression detailed below. The expression retrieves the tick values from the start and end date, subtracts the end date from the start date then divides that value by 864,000,000,000 (which is the number ticks in a day) to convert the value in days and then add 1 day to value so the Start Date is included as day in the calculation.
add(div(sub(outputs(‘4-Compose-EndDateTicks’), outputs(‘3-Compose-StartDateTicks’)),864000000000),1)
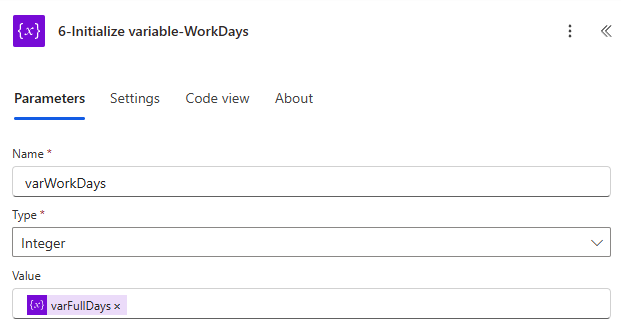
The next action is another Initialize Variable action to be called WorkDays. The variable name is varWorkDays, its type is an integer and it’s value is varFullDays which is the variable from the previous action. This variable will be used to calculate the number of workdays between the Start Date and End Date in the upcoming actions.
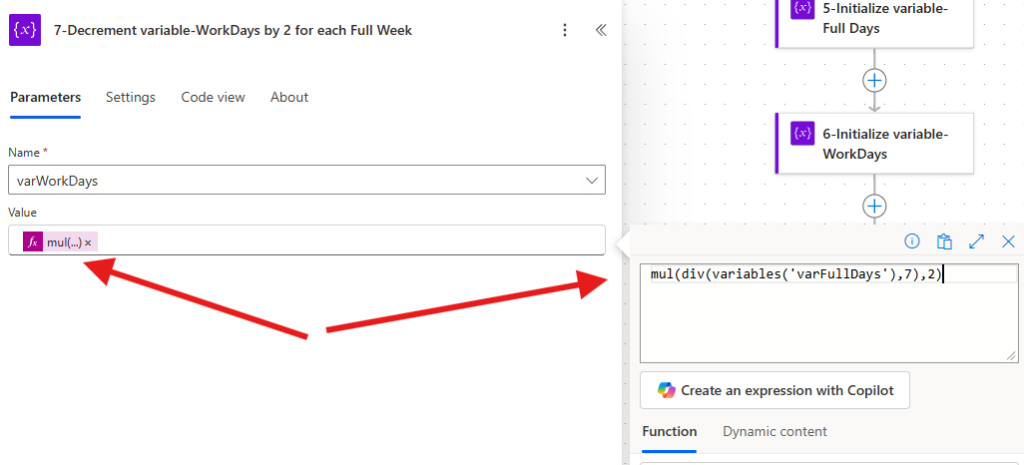
The next action is a Decrement Variable action which is an action that decreases the value of the variable. This action is called Workdays by 2 for each full week. The name of the variable is varWorkDays. The value is an expression detailed below, and it divides the variable by 7 (converting its value into full weeks) and then multiplying that value by 2.
mul(div(variables(‘varFullDays’),7),2)
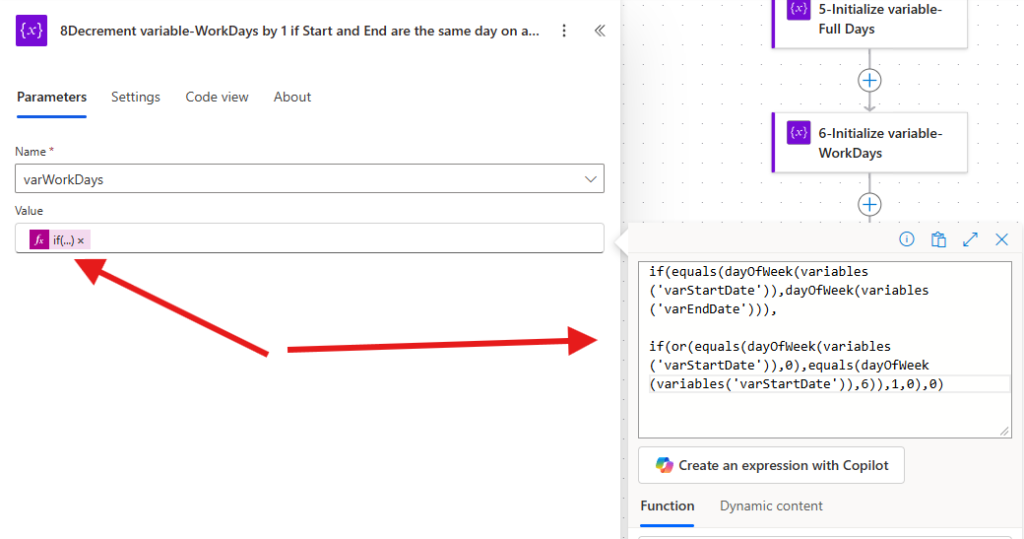
The next action is called “WorkDays by 1 if Start and End are the same day on a weekend”, it is another Decrement action that is using varWorkDays. It’s value is an expression which is shown below. The formula is checking if the Start Date and End Date fall on the same day of the week and if that day is a weekend. If both conditions are true it returns a 1 else it returns a 0. This means the variable will either decrease by one or not at all.
if(equals(dayOfWeek(variables(‘varStartDate’)),dayOfWeek(variables(‘varEndDate’))),
if(or(equals(dayOfWeek(variables(‘varStartDate’)),0),equals(dayOfWeek(variables(‘varStartDate’)),6)),1,0),0)
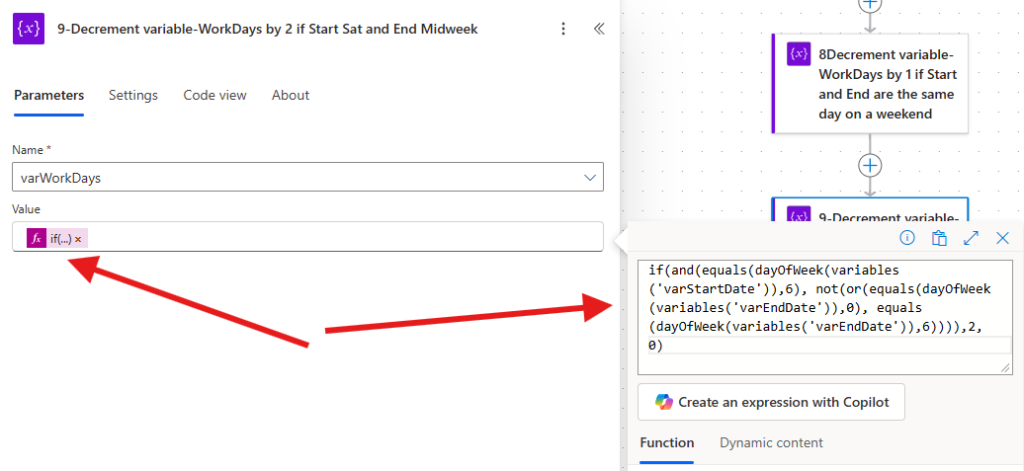
The next action is another Decrement Variable, it’s name is “WorkDays by 2 if Start Sat and End Midweek”. It’s working with varWorkDays and it’s expression is below. The results of this expression returns a 2 if the Start Date is a Saturday and the End Date is a week day, if so it will decrease the variable by 2, else it will return a 0 and not affect the variable.
if(and(equals(dayOfWeek(variables(‘varStartDate’)),6), not(or(equals(dayOfWeek(variables(‘varEndDate’)),0), equals(dayOfWeek(variables(‘varEndDate’)),6)))),2,0)
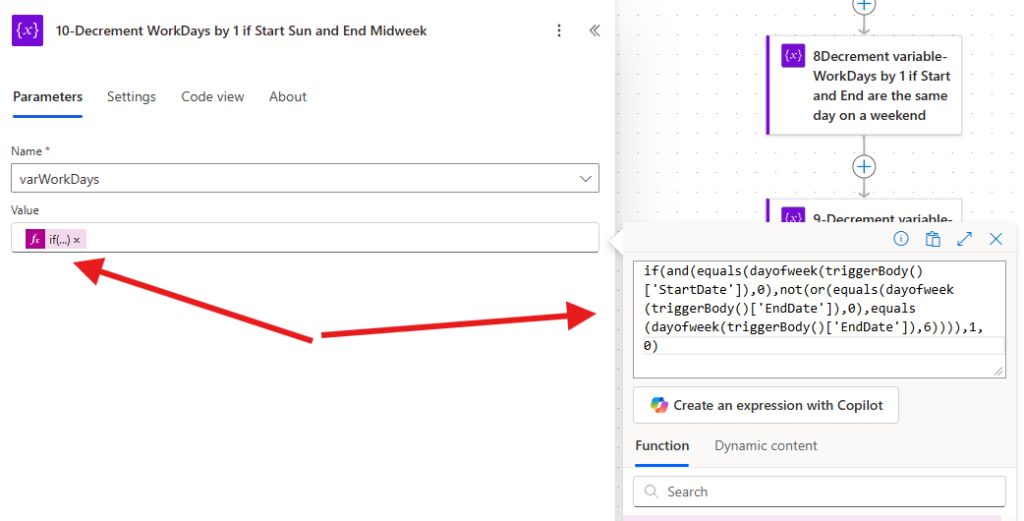
The next action is another Decrement Variable action, it’s name is “WorkDays by 1 if Start Sun and End Midweek” It’s working with varWorkDays and it’s expression is below. The results of this expression returns a 1 if the Start Date is a Sunday and the End Date is a weekday, else it returns a 0.
if(and(equals(dayofweek(triggerBody()[‘StartDate’]),0),not(or(equals(dayofweek(triggerBody()[‘EndDate’]),0),equals(dayofweek(triggerBody()[‘EndDate’]),6)))),1,0)
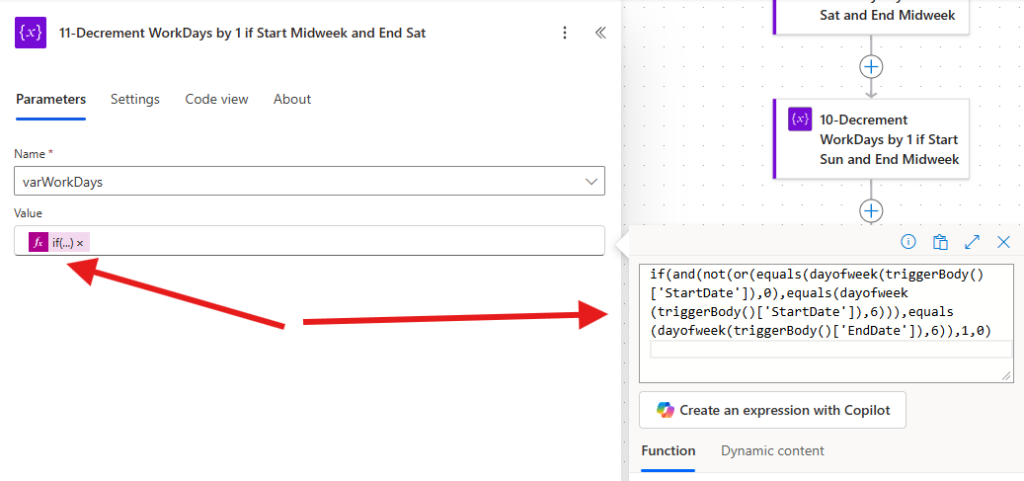
The next action is another Decrement Variable action, it’s name is “WorkDays by 1 if Start Midweek and End Sat” It’s working with varWorkDays and it’s expression is below. The results of this expression returns a 1 if the Start Date is a weekday and the End Date is a Satruday, else it returns a 0.
if(and(not(or(equals(dayofweek(triggerBody()[‘StartDate’]),0),equals(dayofweek(triggerBody()[‘StartDate’]),6))),equals(dayofweek(triggerBody()[‘EndDate’]),6)),1,0)
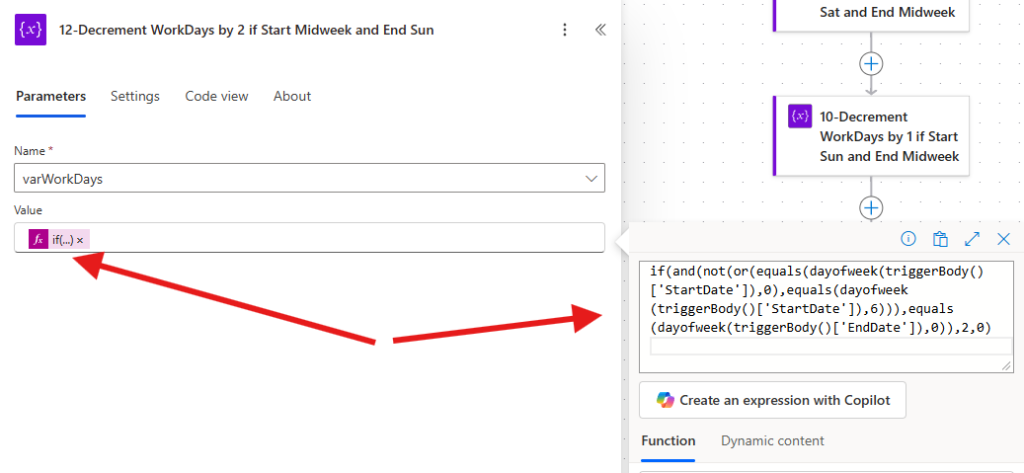
The next action is another Decrement Variable action, it’s name is “WorkDays by 2 if Start Midweek and End Sun” It’s working with varWorkDays and it’s expression is below. The results of this expression returns a 2 if the Start Date is a weekday and the End Date is a Sunday, else it returns a 0.
if(and(not(or(equals(dayofweek(triggerBody()[‘StartDate’]),0),equals(dayofweek(triggerBody()[‘StartDate’]),6))),equals(dayofweek(triggerBody()[‘EndDate’]),0)),2,0)
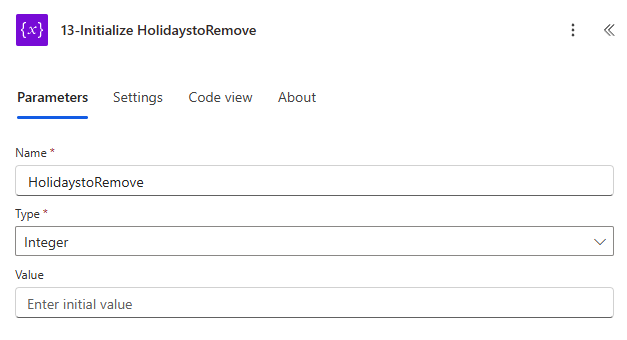
The next action is an Initialize Variable action to create a new variable called “HolidaystoRemove”. It’s an integer and starts with no value.
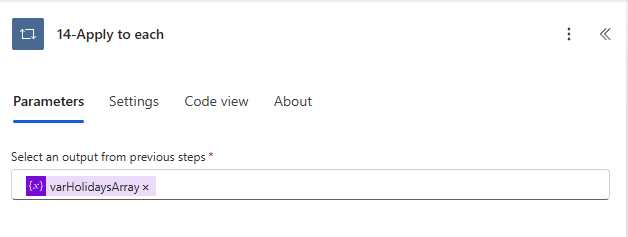
The next action is an Apply to Each action and is cycling through the variable varHolidaysArray.
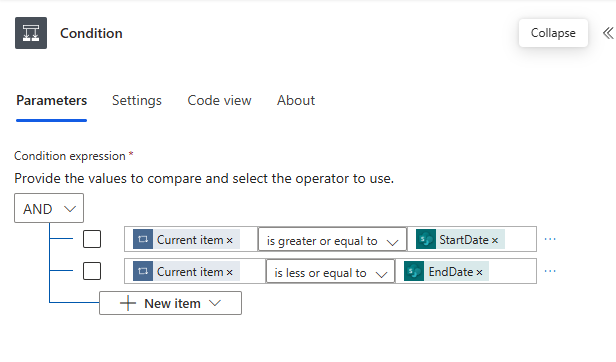
The next action is a Condition and evaluates each date in the array to see if it is between the Start Date and End Date. For each false value nothing will happen.
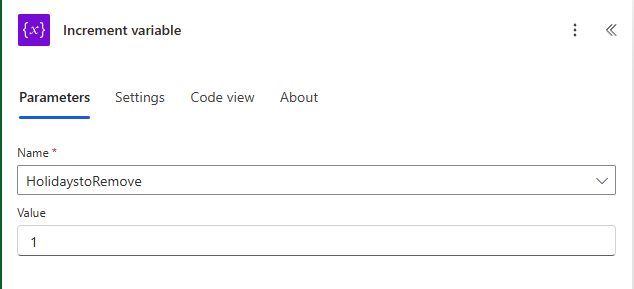
For each true condition increase the variable HolidaystoRemove by 1.
The full view of the Apply to Each action is below:
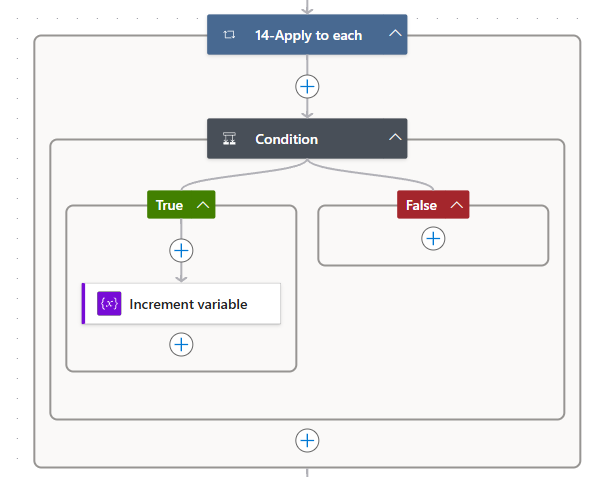
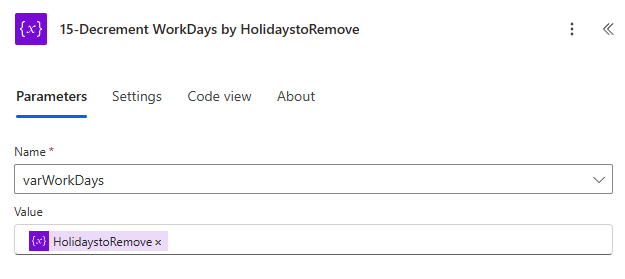
The next action is another Decrement Variable action called “WorkDays by HolidaystoRemove” and it decreases the number of varWorkDays by the number of HolidaystoRemove variable.
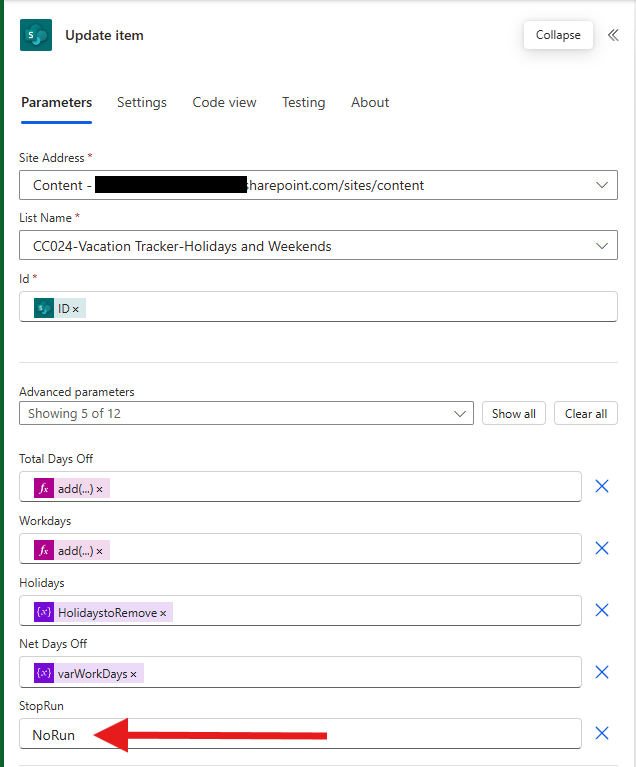
The last action is a SharePoint List Update Item action. Select the Site Address, List Name and ID from the same site as entered in trigger.
Next we are going to update 5 columns in our SharePoint List.
- Total Days Off: Expression, see below.
- Work Days: Expression, see below.
- Holidays: use HolidaystoRemove variable
- Net Days Off: use varWorkDays
- StopRun: Enter “NoRun” directly in the field.
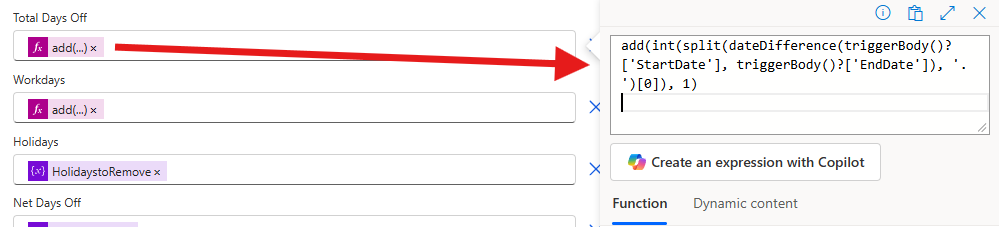
The Total Days Off column has an expression which calculates the difference between the Start Date and End Date and adds 1 to it.
****The formula provided below will trigger an error when the Start Date and End Date are the same. The formula should be as follows:
if(equals(triggerBody()?[‘StartDate’], triggerBody()?[‘EndDate’]), 1, add(int(split(dateDifference(triggerBody()?[‘StartDate’], triggerBody()?[‘EndDate’]), ‘.’)[0]), 1))
Thank-you Alan for the heads up.
The Workdays column is an expression which calculates the difference between all workdays, less weekends and holidays.

This flow can be updated based on the columns created in the SharePoint List. I choose to have Total Days Off, WorkDays, Holidays, and Net Days Off. It may make more sense to show to Total Days Off, Weekends and Holidays or other ways to mix and match. The point is you can update it based on your requirements.